Form designer
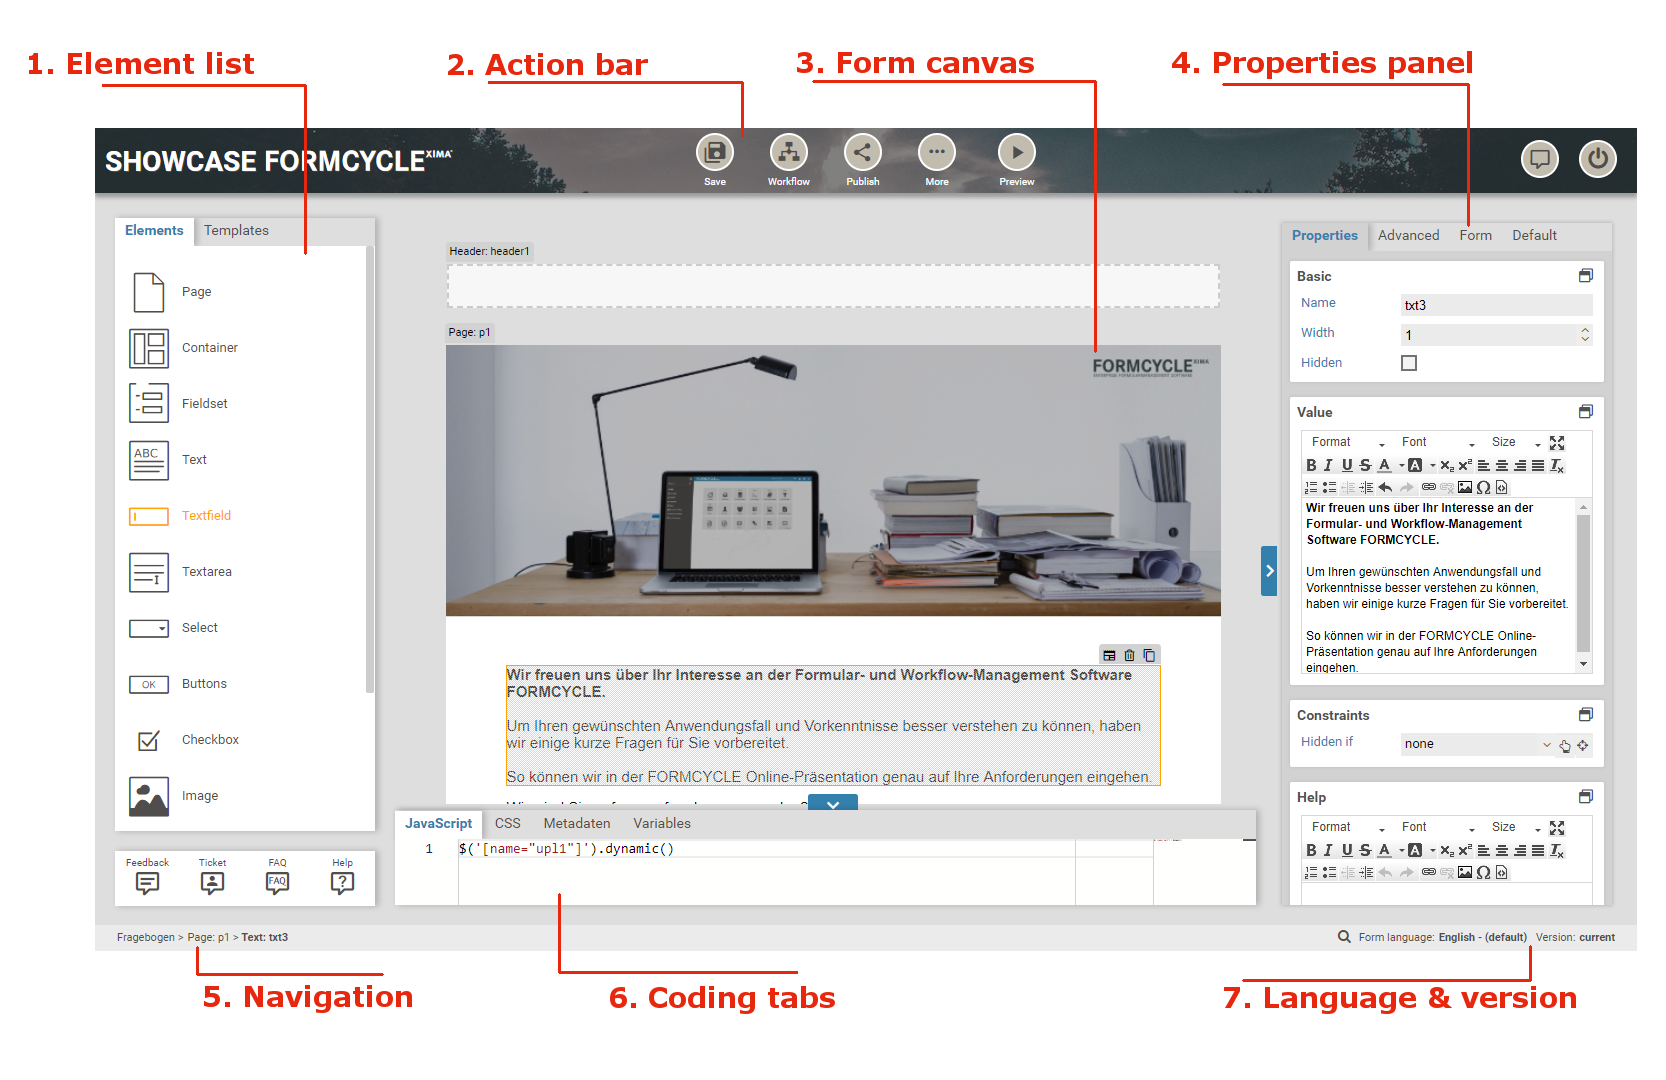
The Xima® Formcycle Designer provides you with a simple user interface for creating forms via drag&drop. Take a form element from the element bar on the left and drag it with the mouse to the form preview in the middle. Click on an existing form element to select it. View or edit its properties in the properties panel on the right.
Use the action bar on the top save the form. It also offers you several more advanced settings, such as setting up the workflow or creating a new datasource for the form.
The following is a short overview of the main sections of the workspace.
Selecting an element
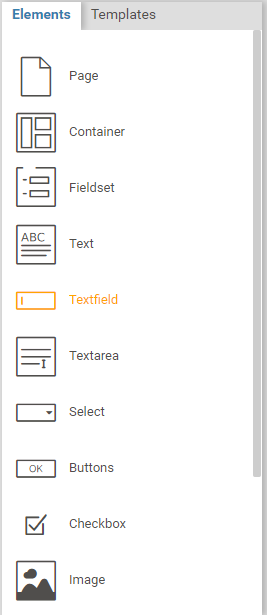
To the left hand side of the Xima® Formcycle Designer you can find the elements bar with all available form elements. To add a form element to the form, click on the element you would like to add and move it with mouse to the form preview in the middle. Place the form element on the position where you wish to insert it. There are several tabs to the top of the element bar:
- Elements
- The standard form elements provided by Xima® Formcycle. These are always available. See also the list of form elements.
- Templates
- Here you can find form templates. Do a right click on a form element to save it as a template that is then available to all forms. See templates for further information.
- More elements
- When a catalogue plugin was installed: This tab offers you more pre-configured form elements provided by the plugin.
More tabs may also show up in case a widget plugin was installed.
Action bar
You can find the action bar at the top of the Xima® Formcycle Designer:
- Save
- Save the current version of the form. This also updates the form immediately: all user who open the form link from now on will see the form as you saved it. You can also use the keyboard shortcut ctrl + s.
- Workflow
- View or edit the workflow of the form. The workflow controls what happens after a form was submitted. For example, you can send emails or create PDF documents. See also workflow processing.
- Publish
- This offers you several options for including the form in your web page. This ranges from a simple standalone link to more complex integrations such as Typo3 and WordPress. See also the publish form menu.
- Preview
- Open a preview of the current form in a new window. Even when you did not save the form yet, this always shows you the form as you see it in the Xima® Formcycle Designer. This lets you try out the form first before you save it. Especially useful when you made the form dynamic with conditions for when to hide or show some form elements.
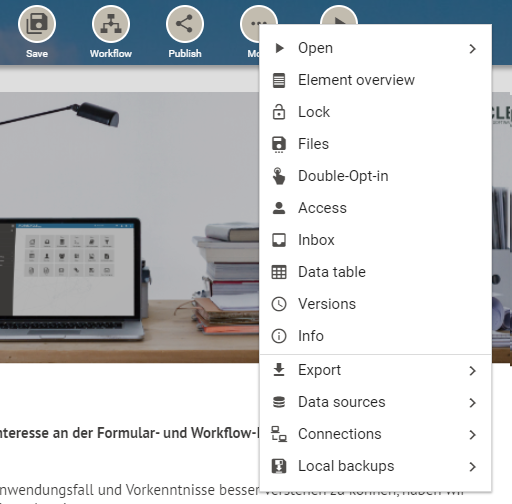
The More button lets you access several advanced settings. Most of these settings are also available in the form overview page. The following settings are available:
- Open
-
- In preview mode
- Open a preview of the current form in a new window. Even when you did not save the form yet, this always shows you the form as you see it in the Xima® Formcycle Designer. This lets you try out the form first before you save it. Especially useful when you made the form dynamic with conditions for when to hide or show some form elements.
- In live mode
- Open the form in a new window. In contrast to preview mode, this will the open the form as it is saved in the system. Unsaved changes will not be present.
- Element overview
- Opens a new window with a list of all form elements in the current form. This lets you quickly get an overview off all elements and its properties. You can also export the list as a CSV or excel file.
- Lock / unlock
- When many users are working in the system, you may run into troubles when multiple users attempt to edit a form simultaneously. Edits made by one user could be overwritten by another user.
To prevent this from happening, you can lock the form. When a form is locked, all other users are receive a warning when they attempt to save the form - Files
- Lets you upload arbitrary files. Should be used for files that are required only for this form. For files shared by multiple forms, upload it as a client resource. See also form resource files.
- Double opt-in
- If necessary, lets you setup a double opt-in process for the form. When a user enters some data and submits the form, they are sent an email and are asked to confirm their submission. Until they do, the submitted data is not processed further in any way. See also double opt-in.
- Access
- Here you can change several settings related to form permissions. For example, you can add a password for opening the form, or change which user groups may edit the form. See also access settings.
- Inbox
- Lets you change the inbox for submitted forms. You can also modify which columns are show in the form-specific inbox. See also inbox settings.
- Data table
- The data table is an advanced options that allows you to create your own database table for submitted form data. See also data table settings.
- Versions
- A list of all versions of the form. You can add a version and delete or export existing versions. See also form versions.
- Info
- An overview with some technical details for the form, such as its ID or the date when it was created.
- Export 6.2.0+
-
- Word / PDF Export
- The form can be exported here as a static Word or PDF document. See also Word / PDF Export.
- Form summary
- A profile with an overview of the most important properties of a form can be created here. See also Form summary.
- Schedules 6.5.0+
- Schedules can be created and edited here. See also Appointment managment.
- Templates 6.6.0+
-
- Design (CSS)
- CSS templates can be configured here, which offer the possibility to define global CSS rules that can be used by all forms. See also Design (CSS).
- HTML
- HTML templates for response pages, privacy policy or the imprint can be created and edited here. See also HTML templates.
- Data sources
-
- Database queries
- Here you can view or edit SQL queries for custom databases. See also database queries.
- LDAP queries
- Here you can view or edit LDAP queries for custom active directories. See also LDAP-Abfragen.
- Sources
- Add a datasource with static CSV, XML or JSON data, such as a list of city names or ZIP codes. It is possible to import EXCEL files as well. You can then use this data in the form, such as with select elements. See also Sources.
- Connections
-
- Database connections
- To run a database query, you first need to configure a connection to a database. This menu entry lets you do that. See also database connections.
- LDAP connection
- To run an LDAP query, you first need to configure a connection to an active directory. This menu entry lets you do that. See also LDAP connections.
- Local backups
-
- Load local backup
- Download the current form as file to your computer. You can use this as an additional backup mechanism, or to share forms with other people. Please note that this only exports the form itself, not the workflow or upload files. To export the entire form with the workflow and all files,use the form export.
- Save local backup
- Upload a form saved on your computer. This replaces the current content of the Xima® Formcycle Designer with the form you select here.
Form preview
Die Formularvorschau in der Mitte ist der Hauptteil des Xima® Formcycle Designer. Hier ist das Formular immer so zu sehen, wie es auch später aussieht. Formularelemente können direkt von der Elementleiste links in das Formular gezogen werden. Alle Änderungen an den Eigenschaften des Formulars im Eigenschaftsbereich rechts haben sofort Auswirkung auf die Formularvorschau.
Move form elements
To move an existing form element to a different position, you have got two options:
- Click on the element and drag it with the mouse to the desired position
- Do a double click on the element, scroll if necessary, and click on the new position. This comes in handy for longer forms as it does not required you to hold down the left mouse button while scrolling.
Copy and delete form elements
To delete or copy (duplicate) a form element, do a right click on the form element. This opens a context menu with several options, such as deleting or duplicating it. Keyboard shortcuts are supported as well: del for deleting an element, ctrl+c and ctrl+v for copying an element.
Search for elements
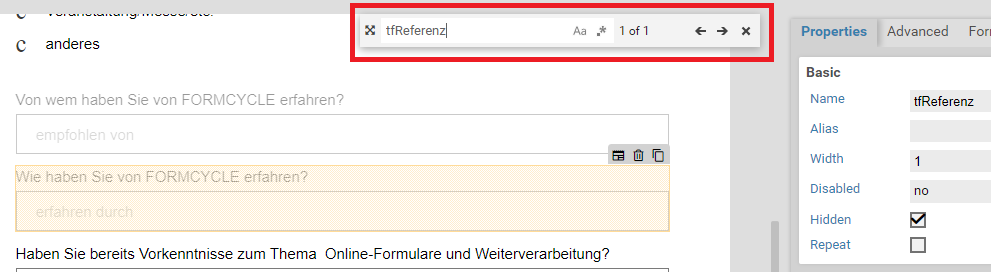
As a form grows larger, finding a certain element becomes increasingly more difficult. Use the element search to locate the element. To open the search bar, either
- click the search button to the bottom right
- or press ctrl+f
Enter the name of the element you are looking for. The search bar shows you how many elements were found. Press enter or click on the left and right arrows to jump to the element. This searches for the name of the element, that is, the name you enter in the base settings section of the properties panel. It it also possible to search for other properties of elements: For example, when you want to search for all options of a select field that contain the word Website, enter options:Website in the search bar.
Properties panel
The properties panel lets you edit both some general settings of the form, as well as the properties of the selected form element. You can switch between different sets of properties by clicking on the tabs at the top:
- Properties
- Available only when a form element is selected: Contains the most common properties of form elements, such as its name, a help text or its constraints. See also the element properties and the list of form elements.
- Advanced
- Available only when a form element is selected: Contains some less common properties, such as user group and state-based restrictions or HTML attributes. See also the element properties and the list of form elements.
- Form
- This tab is always and lets you edit the settings of the current form, such as its name, width, or layout. See also form properties.
- Default
- Available only when a form element is selected: Contains the default settings for each element type. When you place a new element in the form, the new elements gets these properties. For example, you could change the default settings so that all input fields are required fields by default.
Navigation

You can place input fields and other form fields inside fieldsets or containers. And you can also put containers or fieldsets inside containers or fieldsets. To get a quick overview of which containers and fieldsets and element is inside of, look the navigation bar to the bottom left of the Xima® Formcycle Designer. By clicking on a container or fieldset in the navigation bar, you can also quickly select that container or fieldset.
Script and CSS section
This is an advanced section that lets you customize your form even further. Click on the arrow  to the bottom of the Xima® Formcycle Designer to open it. This section consists of four different tabs:
- JavaScript tab
- Write your own custom JavaScript logic to make the form work the way you want. The JavaScript you write in this tab is run automatically once the form is done loading, ie. when the document is ready. All JavaScript files uploaded as a form resource are included automatically in the form (but are run as soon as possible, if necessary, wait for the document to finish loading). Depending on your use case, you may want to extract some parts of your JavaScript into a separate files, especially utility functions and libraries that do not need the DOM to be loaded fully. This cleans up your JavaScript code and makes it easier to understand. For more in-depth details, see the JavaScript tab.
- CSS tab
- Customize the layout and look of your form by adding your own hand-crafted CSS. As with JavaScript, you can also upload CSS files as a form resource, these are loaded automatically as well. See also the help page on the CSS tab.
- Metadata
- The text you enter in this tab is included in the HTML header of the form. This lets you, among other things, add your own meta attributes for search engine optimization. Or you can include some additional script, CSS or font files. See also the meta tab.
- Variables
- Variables are hidden input fields added to the form. Often they are used with JavaScript to store the result of certain computations and make these available for further processing. See also the variables tab.
Language and version

You can find the language and version settings to the bottom right of the Xima® Formcycle Designer:
- The default language of the form is what you enter when you first create the form. Form elements have got many properties, some of which are functional, such as whether it is a required field. Some properties are language-dependent, such as the label text or the placeholder. You can translate these language-dependent properties into different languages to make your form international. To do so, click on the language in the toolbar at the bottom and switch to the language you would like to edit. This hides all functional properties and only shows those properties that need to be translated. see also internationalization.
- Each time you save the form, the system creates a backup automatically. Click on the version in the toolbar at the bottom to switch to an older backup version of the form.