Theme configurator plugin
Plugin download (requires login)
The theme configurator plugin provides you with a user interface for editing various layout settings, such as the font size, color and paddings of a form.
You should install this plugin as a system plugin, although it is also possible to install it as a client plugin, provided that you do not install different version of this plugin in different clients. This plugin itself requires no additional configuration. Once installed, a new entry Theme configurator is added to the main menu at the left-hand side. Please note that you may have to sign out and sign in again.
The theme configuration plugin can be used by two different groups of users:
- Create layout templates
- This step should be performed by users with the appropriate technical knowledge. A template contains information regarding which properties (colors, font sizes etc.) can be edited and which type editor is used, as well as the implementation of the layout in the form of Css declarations. Users can then create a layout based on a template and configure a value for each property (color=red, font size=12px etc.). Creating a template requires a working knowledge of Css and Scss. In case you do not want a users to create or modify a template, you can use a role permission to prevent them from doing so.
- Create layouts
- This step should be performed by users with the appropriate knowledge of good design. You can create a layout based on an existing template, and fine-tune the settings it offers, such as colors and font sizes. You can also create multiple layout based on a template, such as a variation of a layout in red, and a variation in green. Once a layout was created, you can save it either as a Design (CSS) template for the Xima® Formcycle Designer, or as a Css client file.
When this plugin is installed, a new layout template with a corresponding layout is created automatically. It contains the built-in modern theme provided by Xima® Formcycle.
From a technical point of view, this plugin lets you create Scss files that may contain Scss variables and offers a UI with a quick preview feature for assigning a value to each variable.
General notes
Role permissions
This plugin adds a few new permission to the role settings. This lets you control which users should be able to access the theme configurator and which of these users can additionally create or edit layout templates.
Fullscreen mode
The theme configurator contains many settings and as such, it requires quite a bit of screen space. You can click on the expand icon ( ) to the top right to switch to fullscreen mode.
Export
To the left you can find a list of available layout templates, along with the created layouts. Hover over an item in that list with the mouse, and a download button ( ) shows up. Click on that button to download that layout or layout template. In case you download a layout template, you can also select the layout to include in the exported Zip file.
Furthermore, you can also press the upload button ( ) in the action bar to the top left. This lets you import a layout or layout template you exported previously. In case this would overwrite any existing layouts or layout templates, a dialog shows and asks you whether you want to overwrite existing items or create a new layout or layout template.
Files
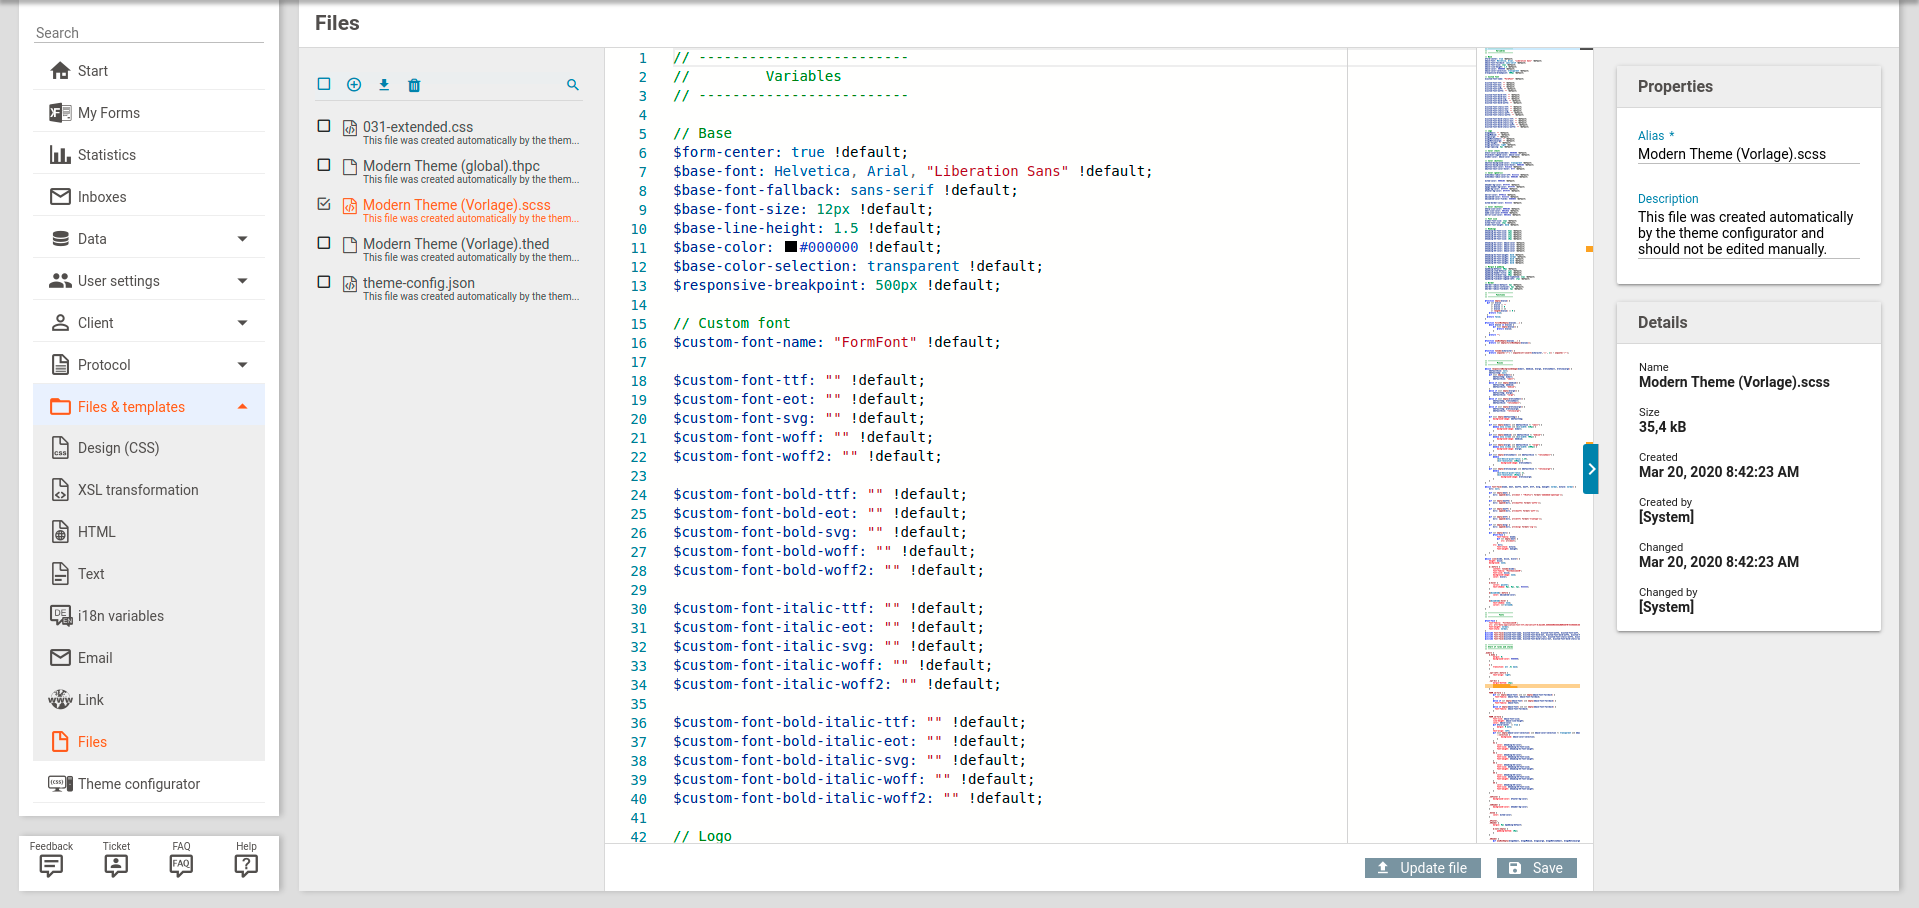
The layouts and layout templates that you created are saved as client files. You should not edit these files manually. You could, however, download these files and upload them in another Xima® Formcycle system.
The files that are created plugins may have the following file extensions:
- .scss
- Stands for Sassy CSS. These are Scss files that contain the implementation of a layout.
- .thed
- Stands for theme editor (configuration). A Json file that contains the editable properties (variables) of the Scss file and which editor should be used for each variable. Corresponds to layout template.
- .thpc
- Stands for theme processing (configuration). A Json file that contains the values for each configurable propertz (variable). Corresponds to a layout.
- .css
- Stands for cascading style sheet. A Css file generated from a layout.
Fixing missing or invalid references
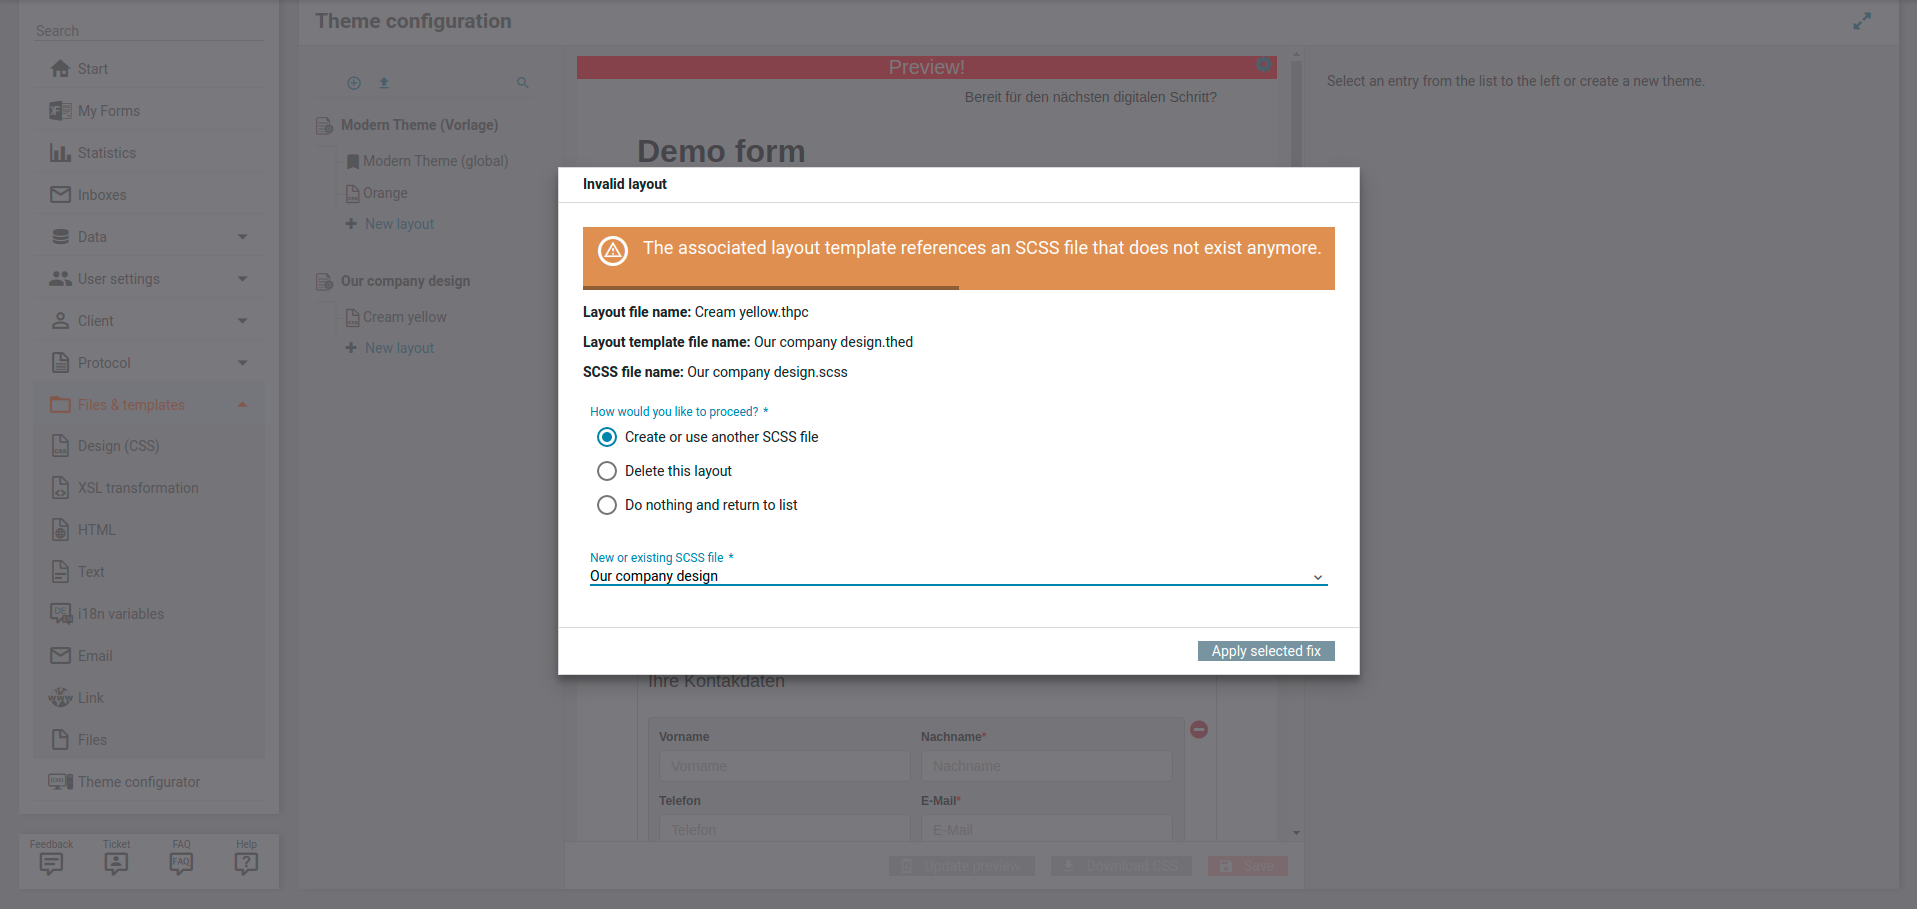
The layout and layout configuration files reference other files. For example, the layout contains a (soft) reference to the layout file. It is possible for somebody to delete the referenced file. If that happens and you select a layout or layout template with missing references, a dialog shows up. It tells you exactly what is wrong and offers several options to fix it, such as by selecting another layout template or creating a new one.
Creating a layout
Basic actions
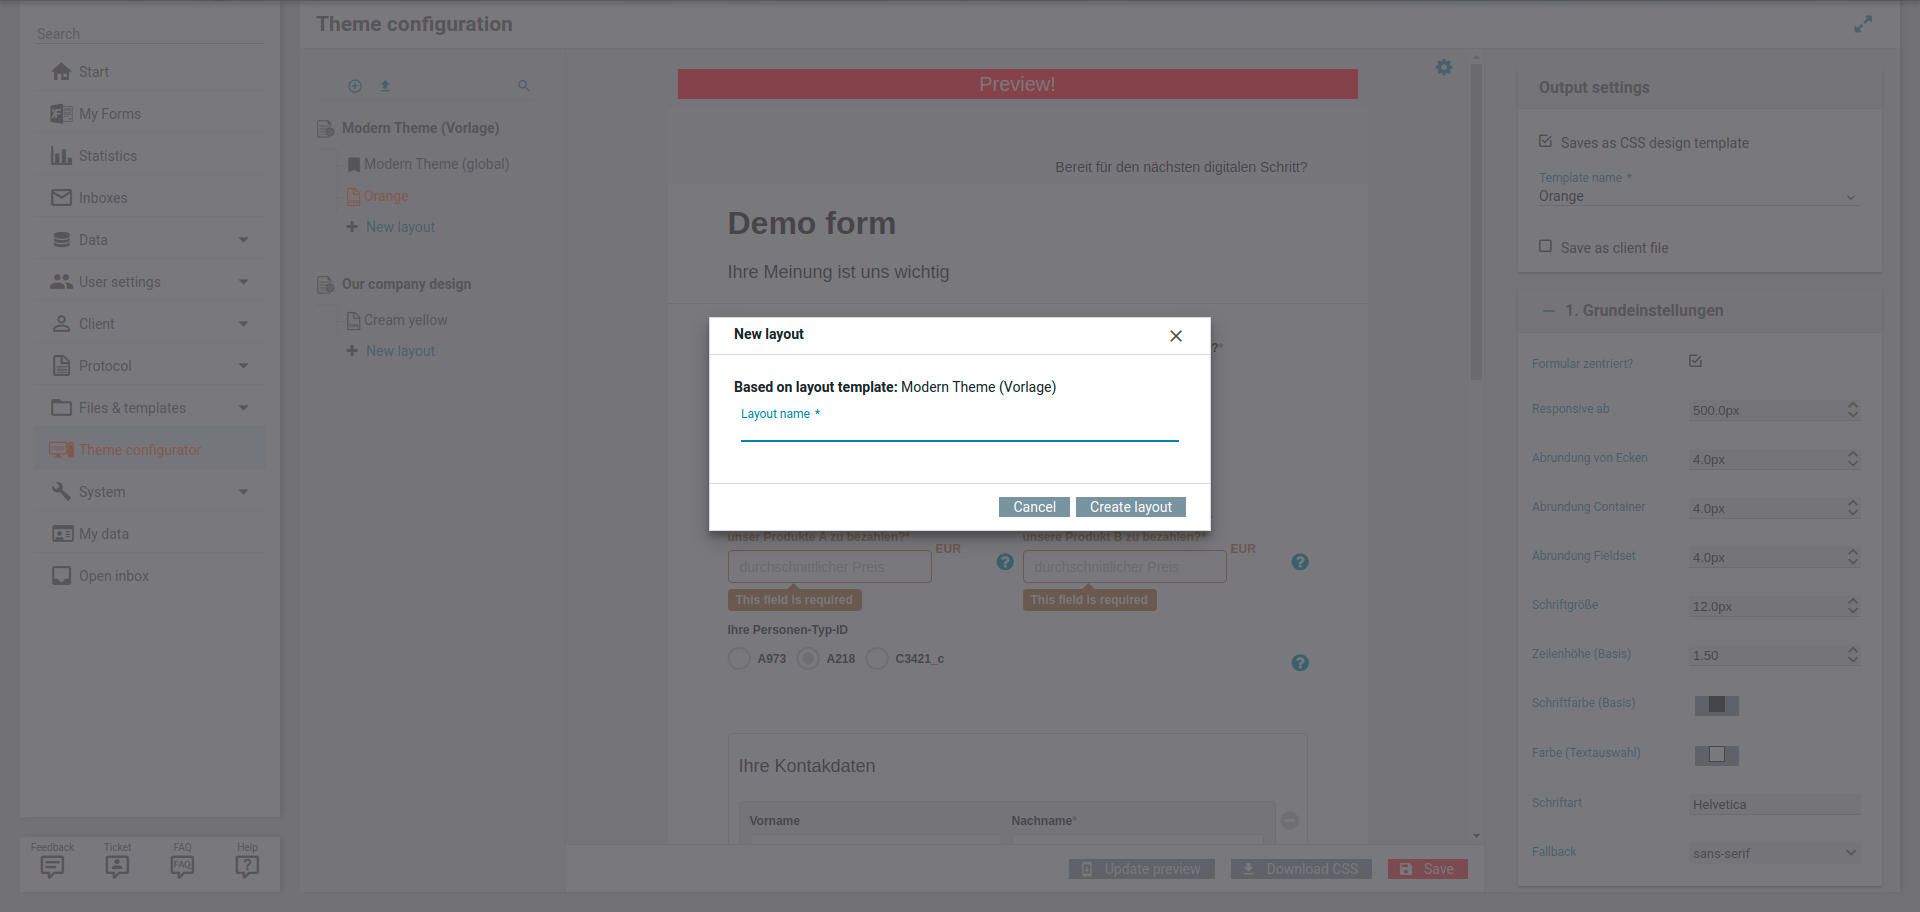
To create a new layout based on an existing template, click on the button New theme with a plus icon ( ) in the list to left. This opens a new dialog where you can enter a name for the layout
Once you have created the new layout, you can find it in the list to the left, below the layout template. Click on the layout to edit it.
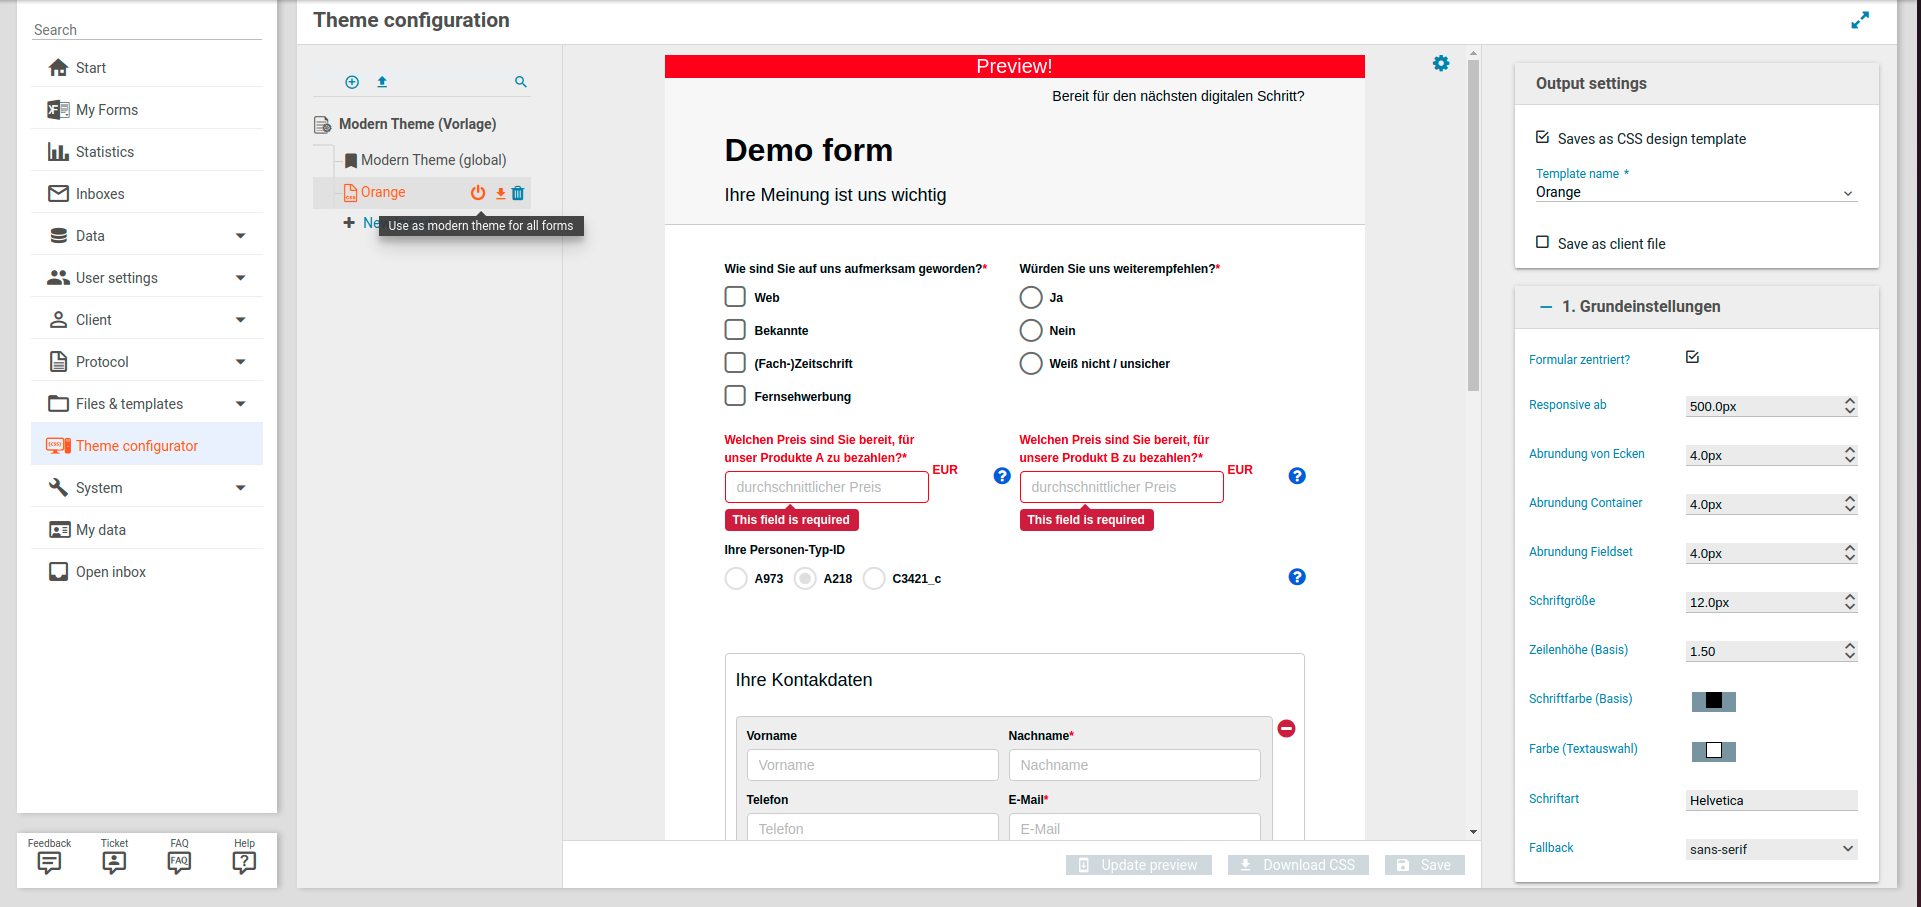
When you hover over a layout with the mouse, an activation icon ( ) appear. Click on that icon to mark the layout as the default modern theme. This overwrites the builtin modern theme provided by Xima® Formcycle and is applied to all forms that make user of the modern theme. Whether a form makes use of the modern theme, see the properties panel to the right of the Xima® Formcycle Designer, in the form tab. Please note that at most one layout can be marked as the default modern theme. Technical note: Marking a layout as the default modern theme creates a client file with the name 031-extended.css, which overwrites the file of the same name provided by Xima® Formcycle.
The actionbar to the bottom offers three actions:
- Update preview
- Updates the form preview in the center, so that it reflects the current properties of the layout. By default, the preview is updated automatically once you change any property. Use this button in case that fails.
- Download Css
- If necessary, you can download a copy of the Css that is generated from the current layout.
- Save
- Saves the current layout with all configured properties. In case the layout should also be saved as a Css client file or Design (CSS) template (see the properties section to the right), these files and templates are also created or updated now.
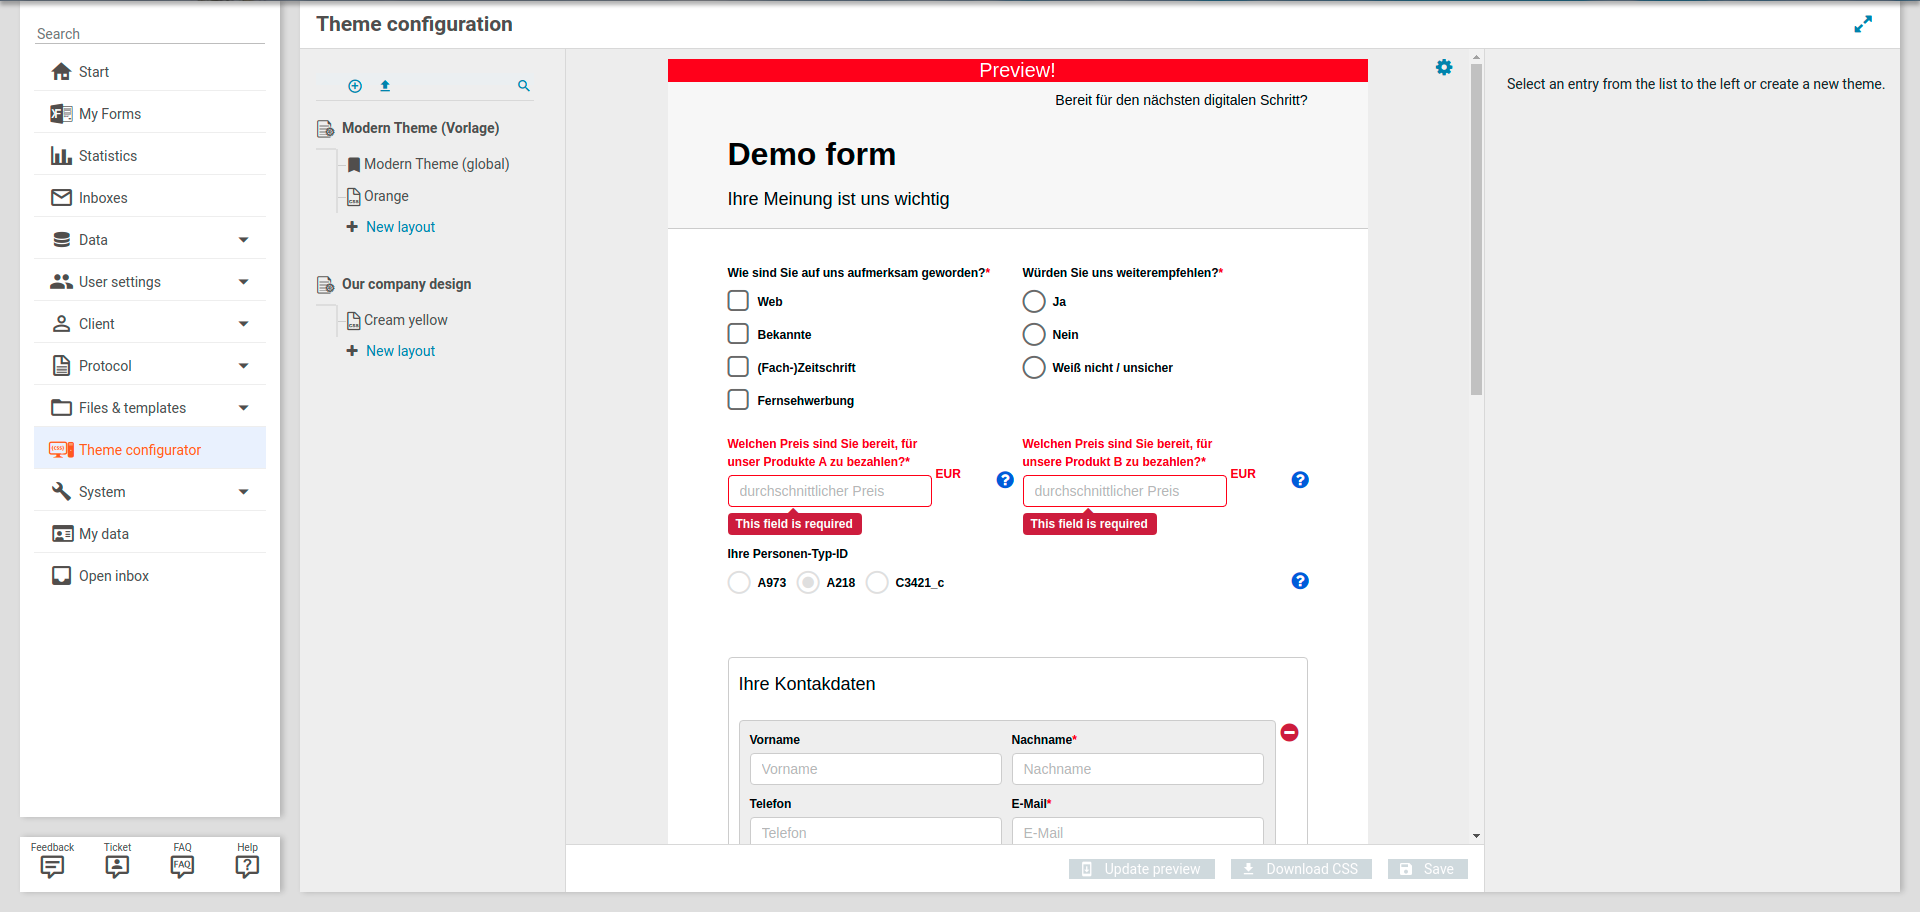
Preview section
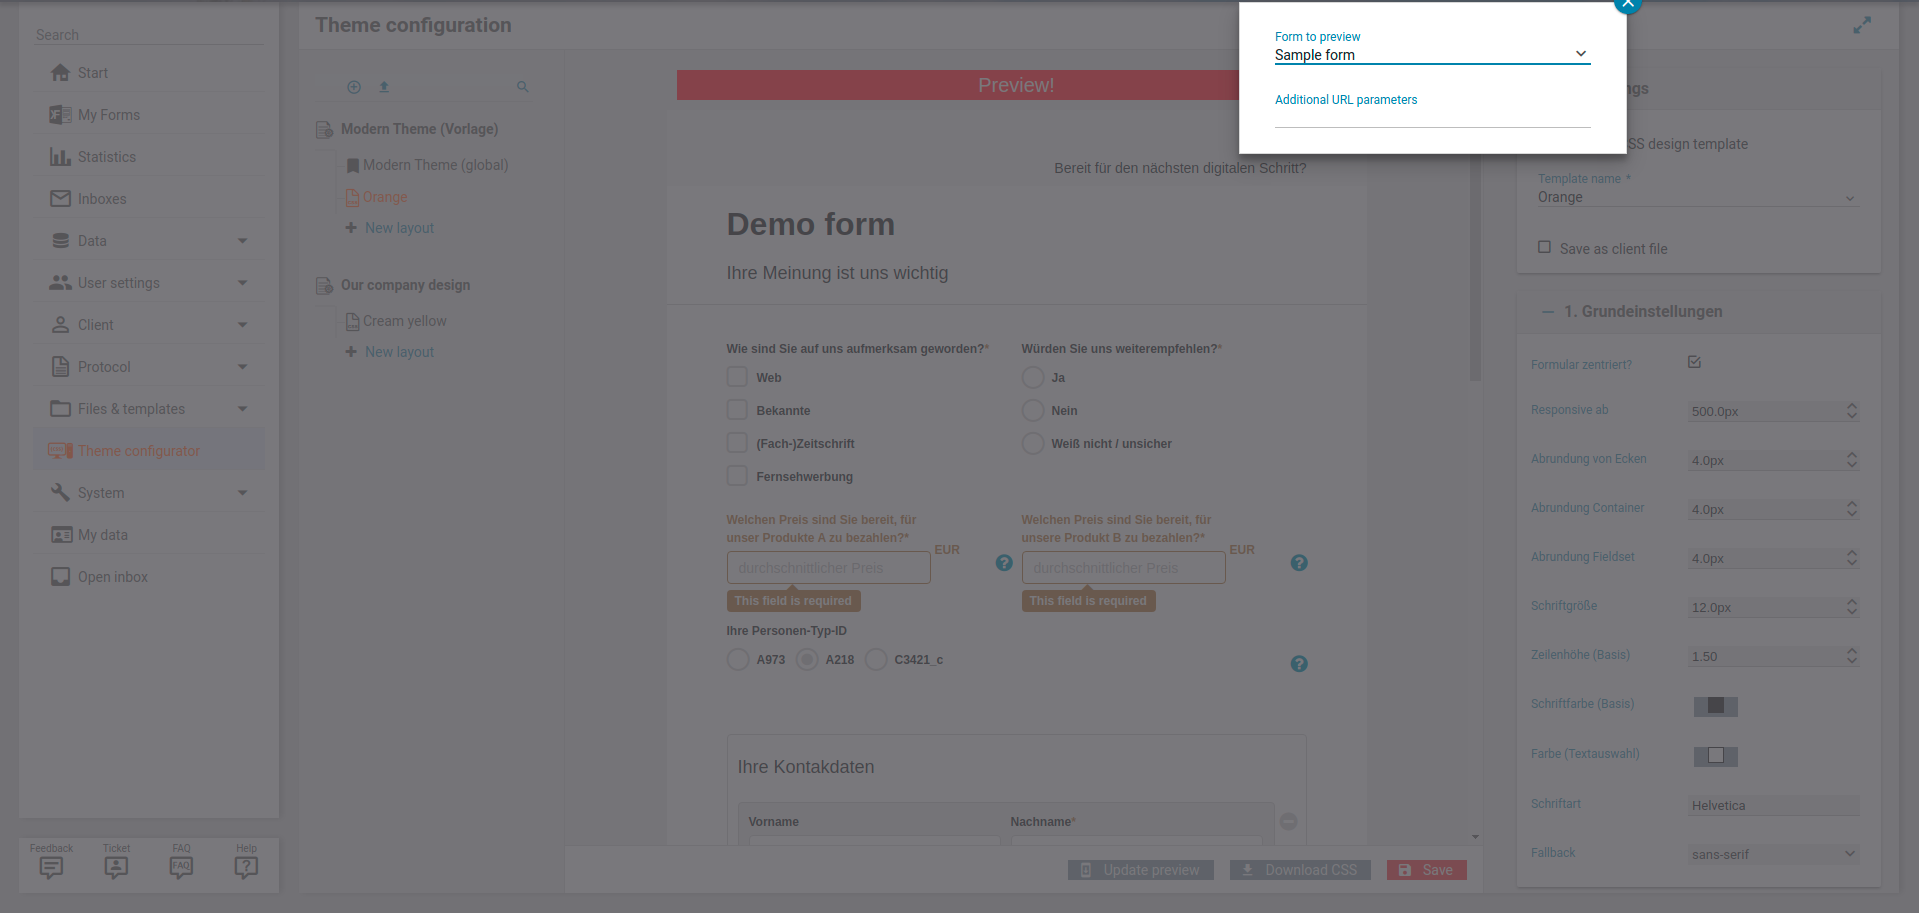
The section in the center contains the form preview. It shows a form and how that form would look like with the current layout. By default, a demo form is used that does not exist in the system. To select an existing form, click on the blue gear icon to the top right ( ) and select the form. As an advanced setting, you can also append additionalt Url parameter to the form Url.
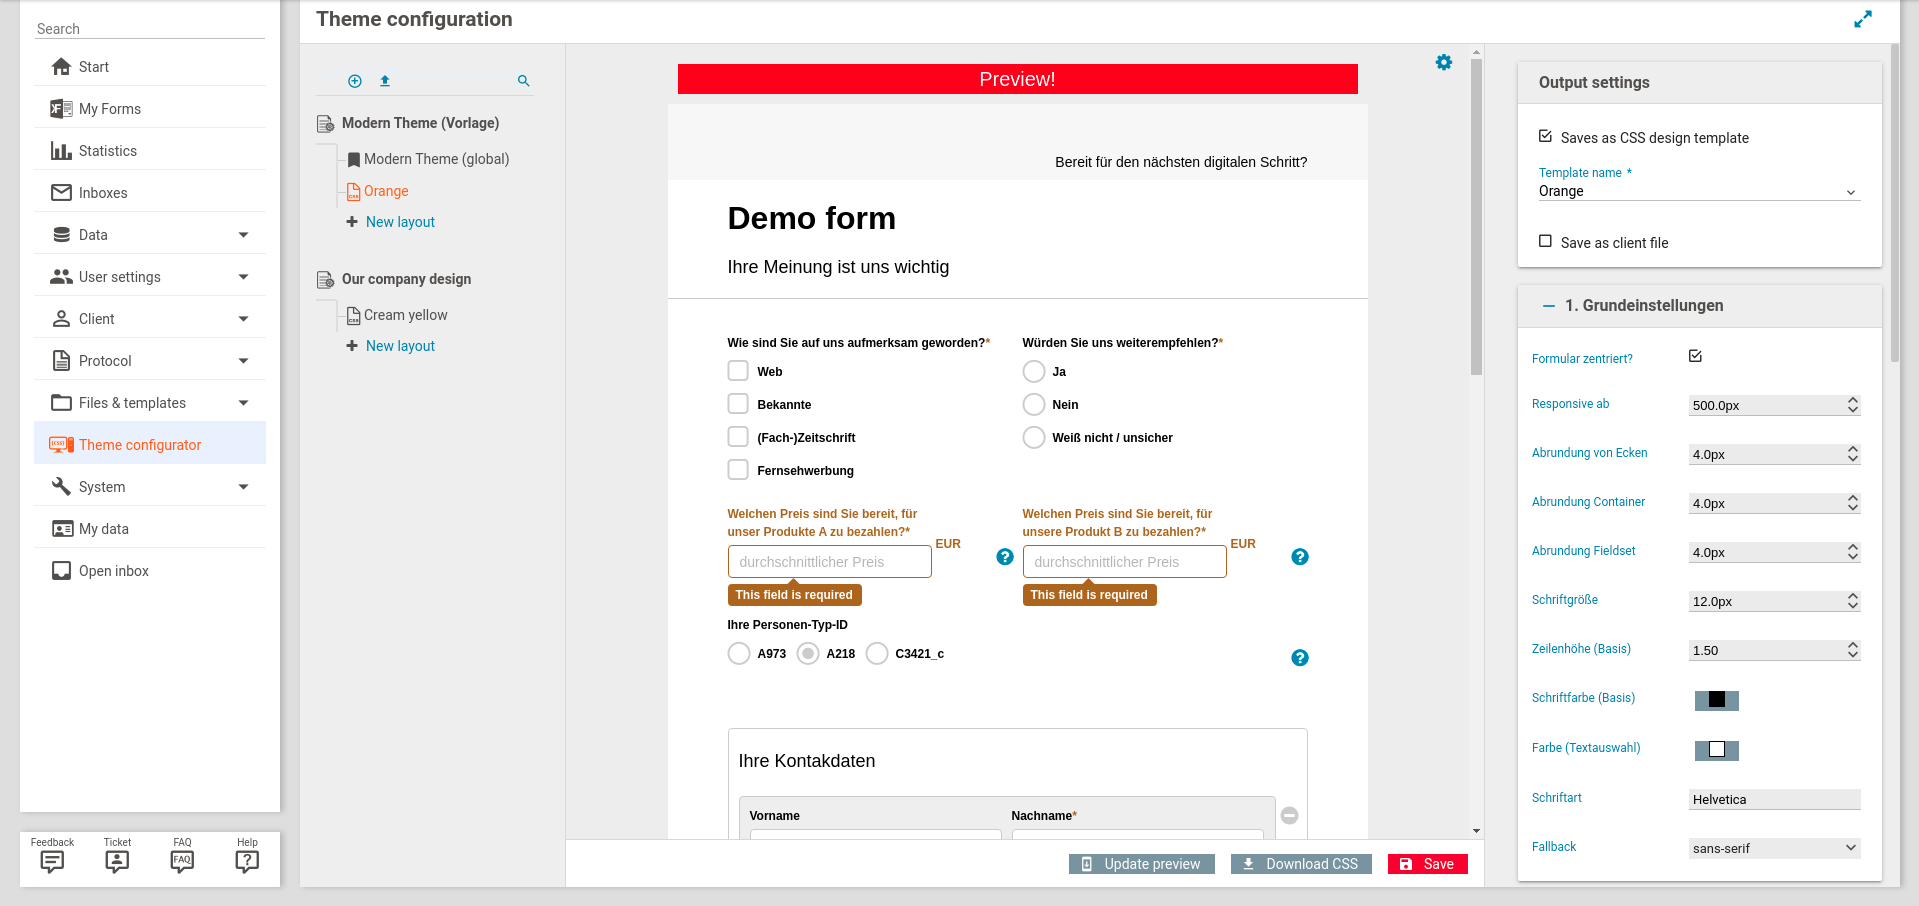
Editing section
The editing section to the right lets you edit the layout. The layout settings consist of two parts.
The first part, corresponding to the first fieldset, contains some general settings regarding the layout:
- Save as Design (CSS) template
- When this option is enabled, the layout is saved as a template for the Xima® Formcycle Designer, and appears in the menu Design (CSS).
- Save as client file
- When this option is enabled, the layout is saved as a Css file in the client files.
If the layout is saved as the default modern theme, a note to that effect also appears there (see above for details).
The second parts contains the actual properties of the layout that affect how the form will look like, and corresponds to all remaining fieldsets. Which fieldsets and properties are available depends on the layout template. Usually you can edit colors, font sizes, logo images and more.
Creating a layout template
A layout template consists of two parts. First of all, you need to create a Scss files that contains the rules and declarations required for the layout. The Scss may contain variables that are later configurable by the user, when they create a new layout. Secondly, you need to choose which variable are editable and which editor should be used for each variable (such as a text editor, pixel editor, color picker etc.). Thirdlz, you can optionally adjust some settings regarding the transpilation of the Scss into Css.
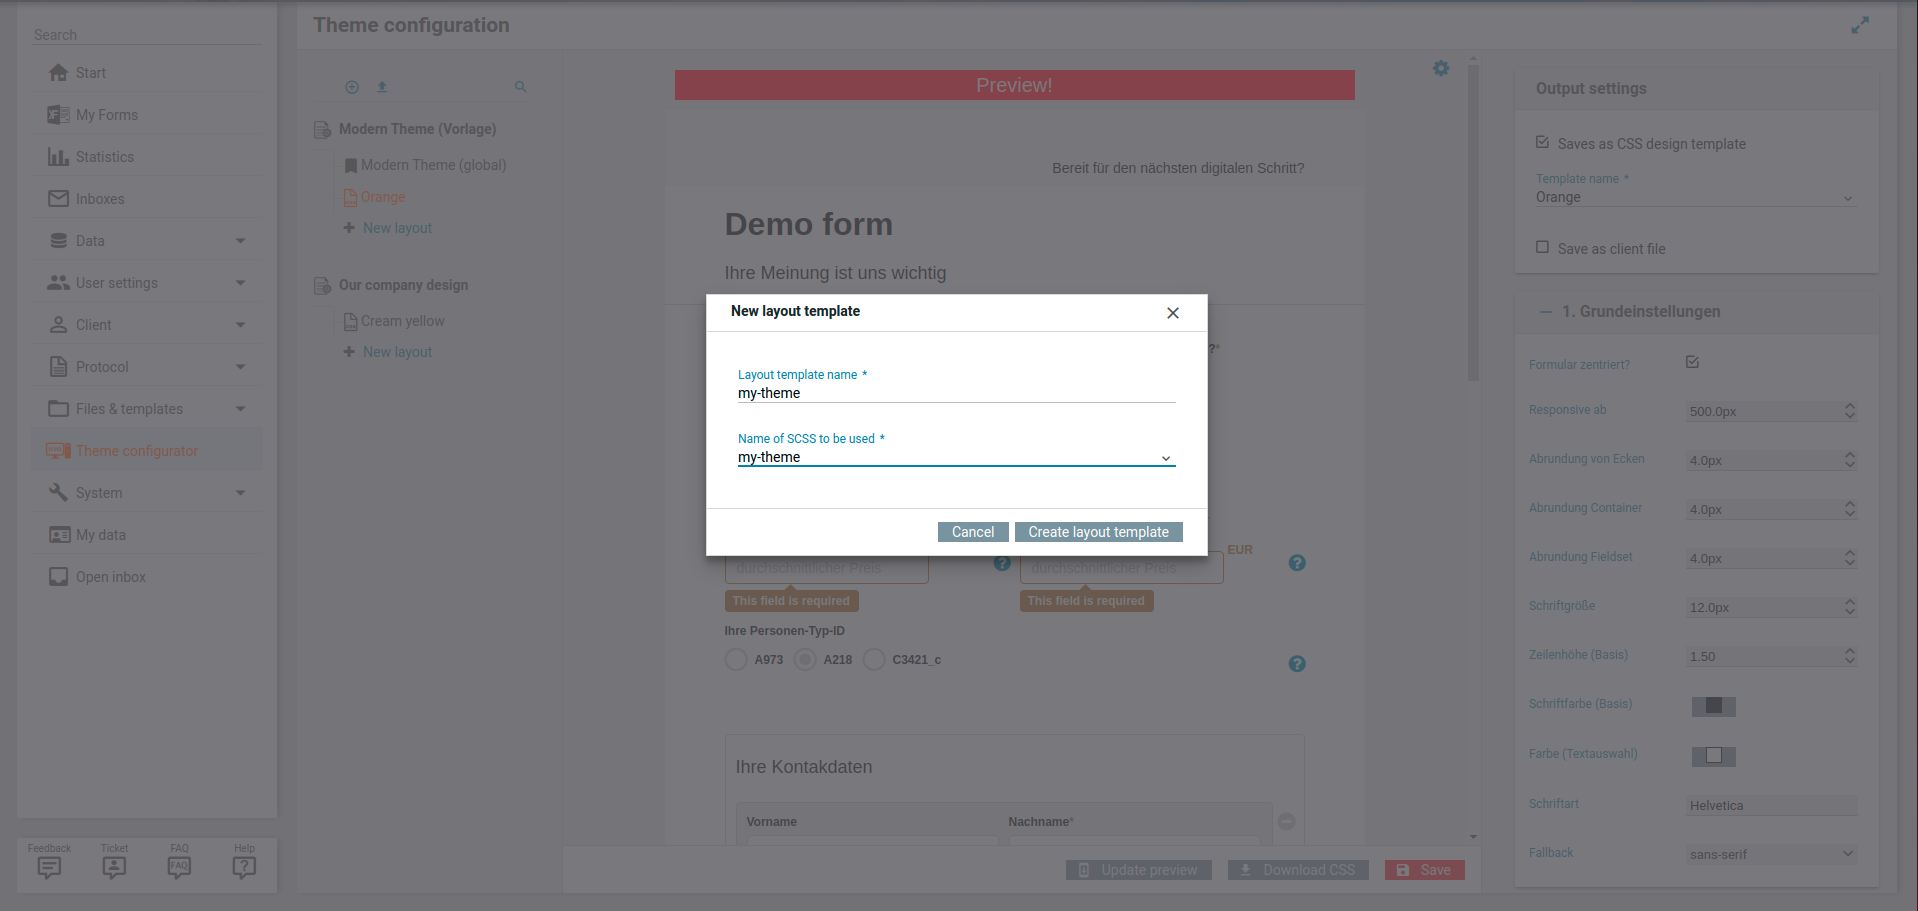
To create a new layout template, click on the plus icon ( ) to the top left. This opens a dialog where you need to enter a name for the layout and a name for the Scss file. Unless required otherwise, you should use the same names.
Click on the layout template in the list to the left to edit it.
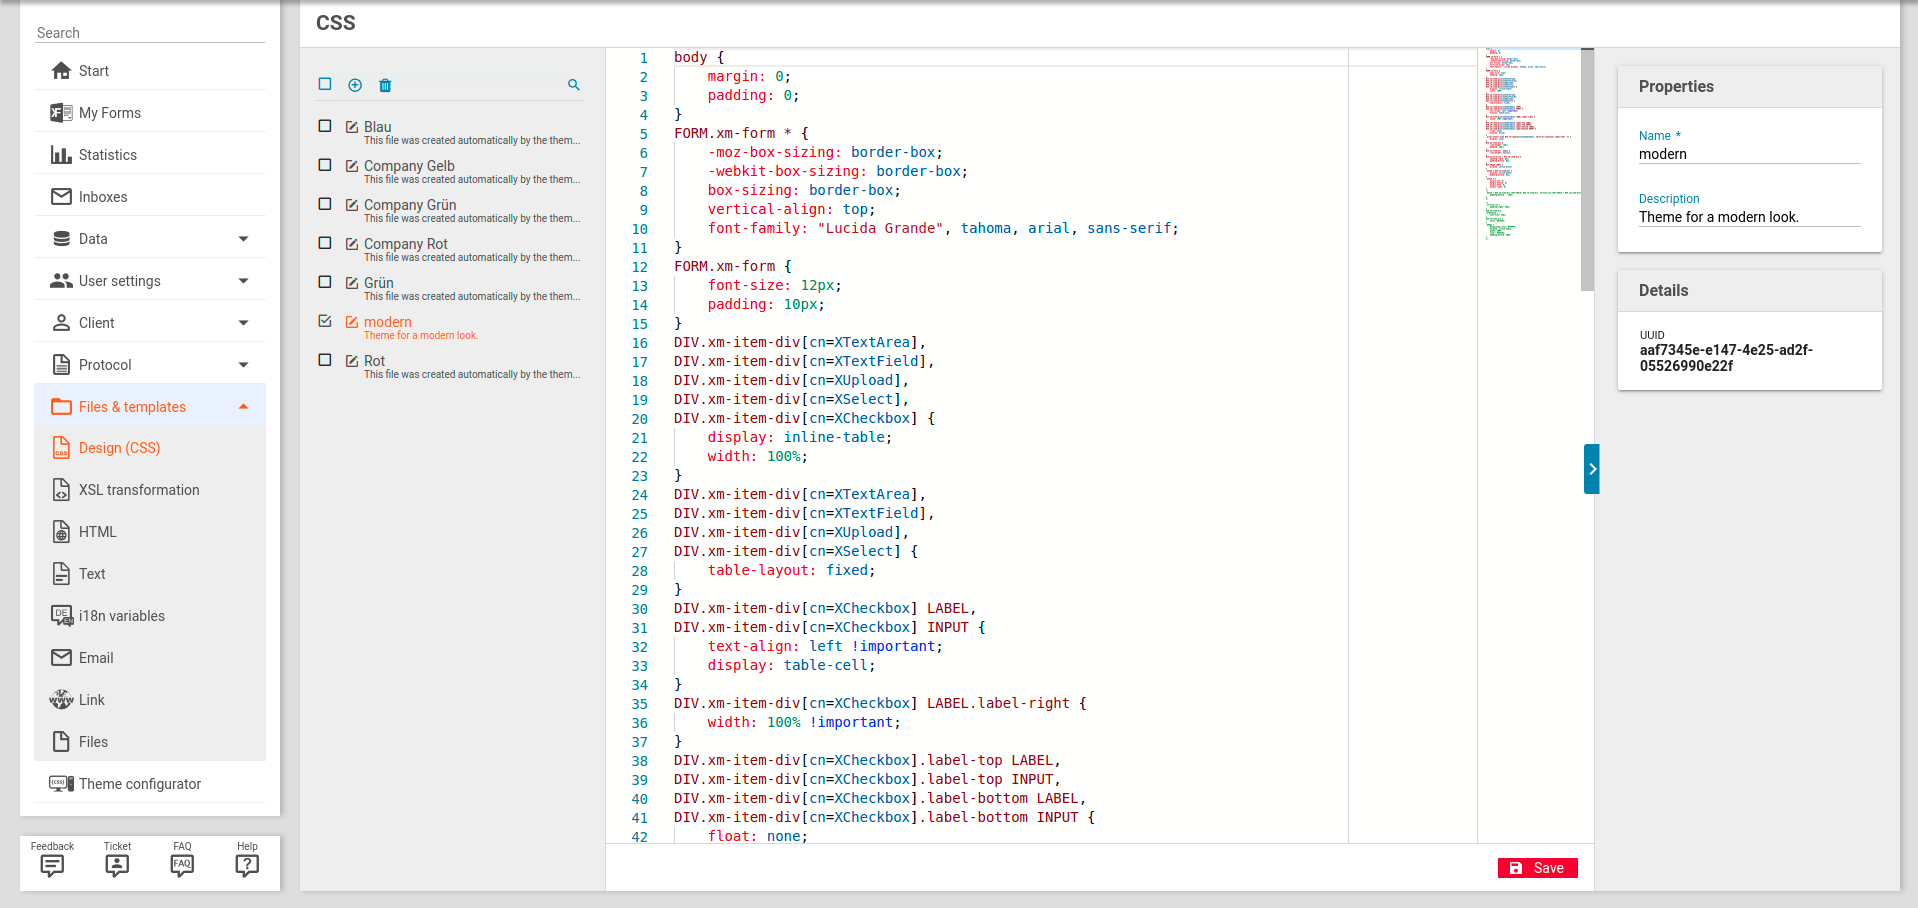
SCSS template
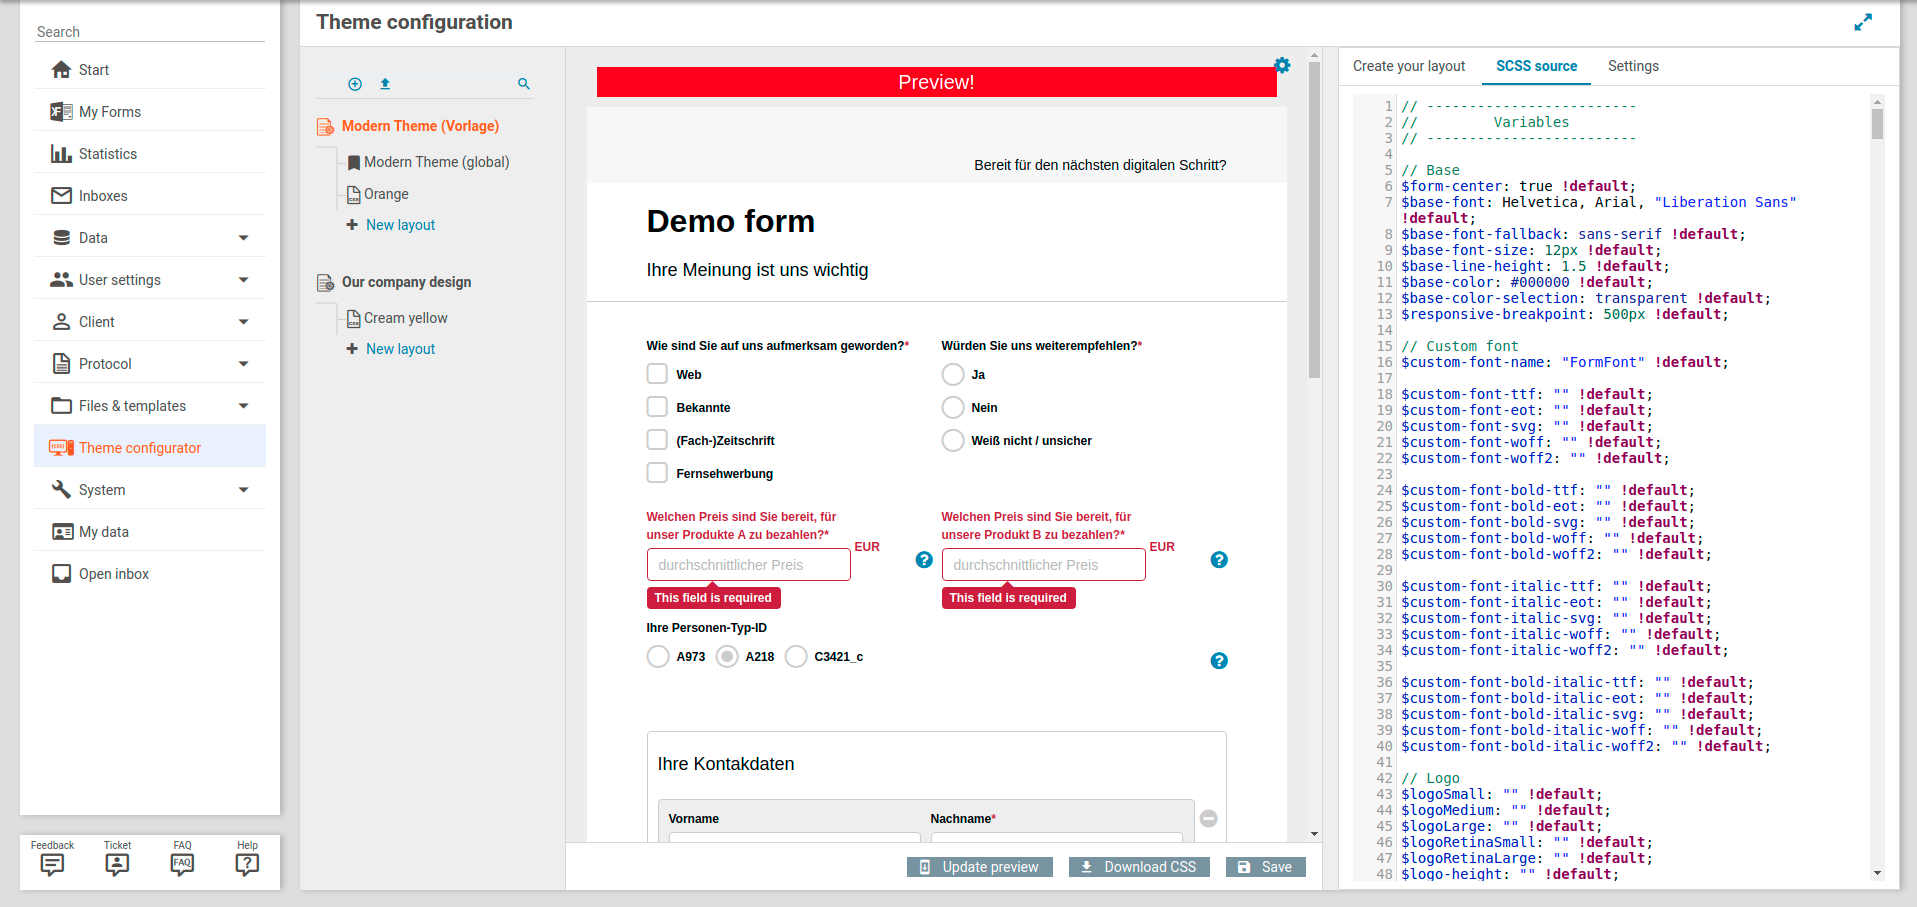
The Scss lets you edit the Scss file of the layout template.
You can make use of Scss variables. The value of each variable can then be set by the user when they create a new layout based on this template. Scss variables always start with a dollar sign ($) and should not be confused with Css variables.
To set the values of each variable, this plugin adds the appropriate variables declarations when transpiling the Scss file:
$color: red;
$fontSize: 16px;
$fontFamily: "Liberation Sans";
// Your SCSS rules and styles come here
// ...
We recommend you set a default value for each variable in the Scss file. Anybody who reads the Scss will find it easier to see which variables are available. Make sure you add the default rule to the variable declarations, or they will override the layout settings:
// Not required, but good practice
$color: red !default;
$fontSize: 16px !default;
$fontFamily: "Liberation Sans" !default;
// Rules and styles come here
body {
color: $color;
font-size: $fontSize;
font-family: $fontFamily;
}
// ...
Finally, you can also import other Scss files:
@import "client/current/file.scss";
// You can also import a file from another client
// Select a client by its name, alias, ID, or UUID
@import "client/name/demo/file.scss";
@import "client/alias/demo/file.scss";
@import "client/id/152/file.scss";
@import "client/uuid/c33c63c7-8047-4727-bcda-8d07e2c36d4d/file.scss";
// You can also import a CSS file
@import "client/current/file.css";
// You can also import another layout template
// It is transpiled with the default variable settings before being imported
@import "client/current/file.thed";
// You can also import another layout
// It is transpiled with the variable settings before being imported
@import "client/current/file.thpc";
// Import a file only when transpiling for a preview
// A SCSS file is transpiled (a) when the user clicks the save
// button, which also saves the result a client file or design template.
// And (b), when the user has changed an option in the UI and we want to
// to update the preview in the center section of the UI.
@import "client/current/file.scss?previewOnly";
Editor configuration
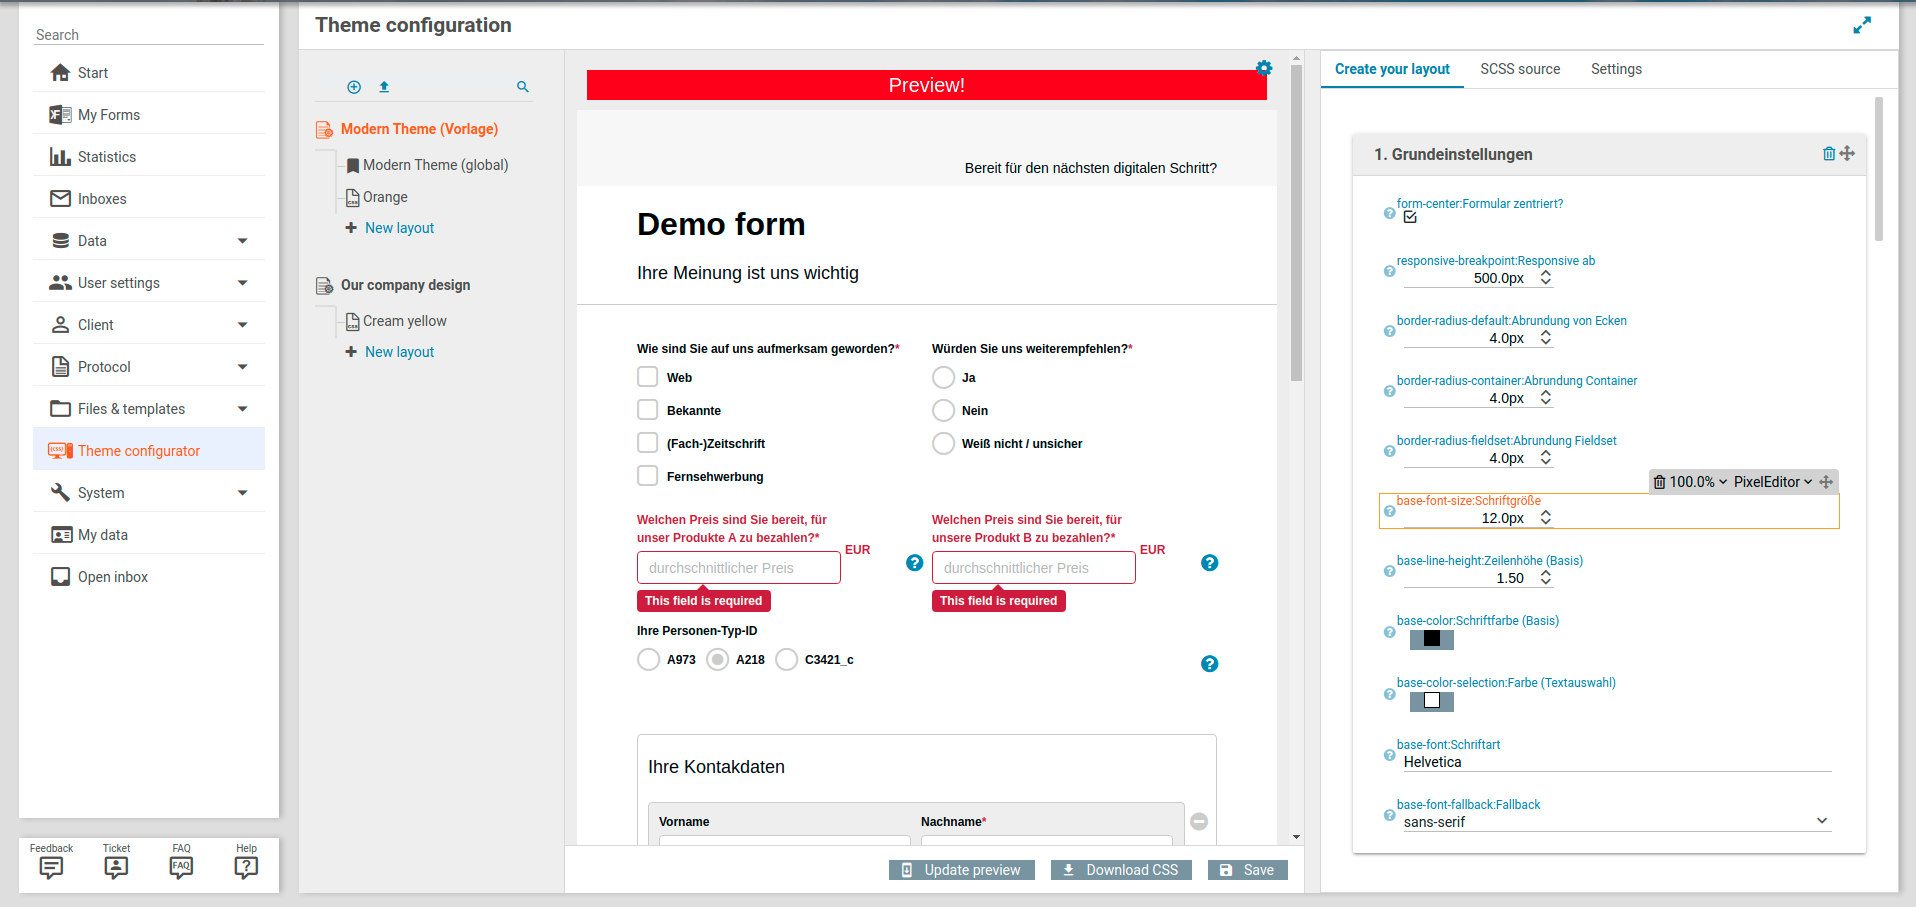
The editor configuration can be found in the first tab of the section to the right. Here you can configure which Css variables are editable by the user when they create a new layout based on this template. For each variable, you can select
- the editor that is used for editing the variable's value (such as a text editor, file editor, or pixel editor); and
- the position of the editor in the user interface.
The configuration is somewhat similar to how forms are designed in the Xima® Formcycle Designer and supports drag & drop.
- By default, all editors are placed vertically, one editor on each line. If you activate the advanced option (see the view settings below), editors can also be placed next to each other. We recommend to use this option sparingly, as it quickly results in visual clutter.
- All editors are grouped in fieldsets. This enforces a clearer structure and makes the relevant settings easier to find.
To add an editor, proceed as follows:
- When you just created a new layout template, there is only one button: New group. This adds a new group (fieldset).
- This group now contains another button: New editor. This adds a new text editor with the default settings to the group.
- To add another group, click on the plus icon that appears when you hover over the free space between two groups with the mouse.
- To add another editor to a group, click on the plus icon ( ) that appears when you hover over the free space between two editors.
You can change the following settings for each editor:
- Set the variable name and display name
- For each editor you need to select a variable and a display name. The display name is what is shown to the user when they create a new layout. To edit the variable and display name, click on the blue label to the top left of the editor. This opens an input field. Enter the new variable name and display name, separated by a colon: <variable-name>:<Display Name>. Note: This is unambiguous due to a colon not being allowed in Scss variables.
- Change the editor type
- When you hover over the editor with the mouse, a settings bar appears to the top right. Here you can choose the type of the editor. Several predefined editors are available, such as simple text editors, color pickers, pixel editors or file choosers. Some generic editors require additional settings. If they do, a gear icon ( ) appears next to the editor type selection. Click on that icon to open an overlay with the additional settings. For example, the DecimalRangeEditor contains additional settings for the minimum and maximum value as well as the step size.
- Define a default value
- To define a default value for the variable, just use the editor to enter a value.
- Add or change the help text
- Optionally you can add a help text to each editor. This help text is later shown to the user when they edit a layout. To add a help text or change an existing help text, click on the blue question mark icon ( ) to the left of the editor. gedrückt werden. This open an input field where you can edit the help text.
- Change the width of the editor.
- Applicable only when multiple editors are placed next to each other. When you hover over the editor with the mouse, a settings bar appears to the top right. Here you can also change the relative width of the editor. This width is relative to the other editors placed in the same line as this editor.
- Move and editor to another location
- You can move an editor to another location via drag & drop. Use the grab icon ( ) to initiate a drag.
- Delete an editor
- Hover over an editor with the mouse. This brings up an action bar to the top right of the editor with a trash icon ( ). Click on that icon to delete the editor.
Transpilation settings
The settings tab lets you edit several advanced settings that affect how the Scss is transpiled into Css. It consists of four sections as described below.
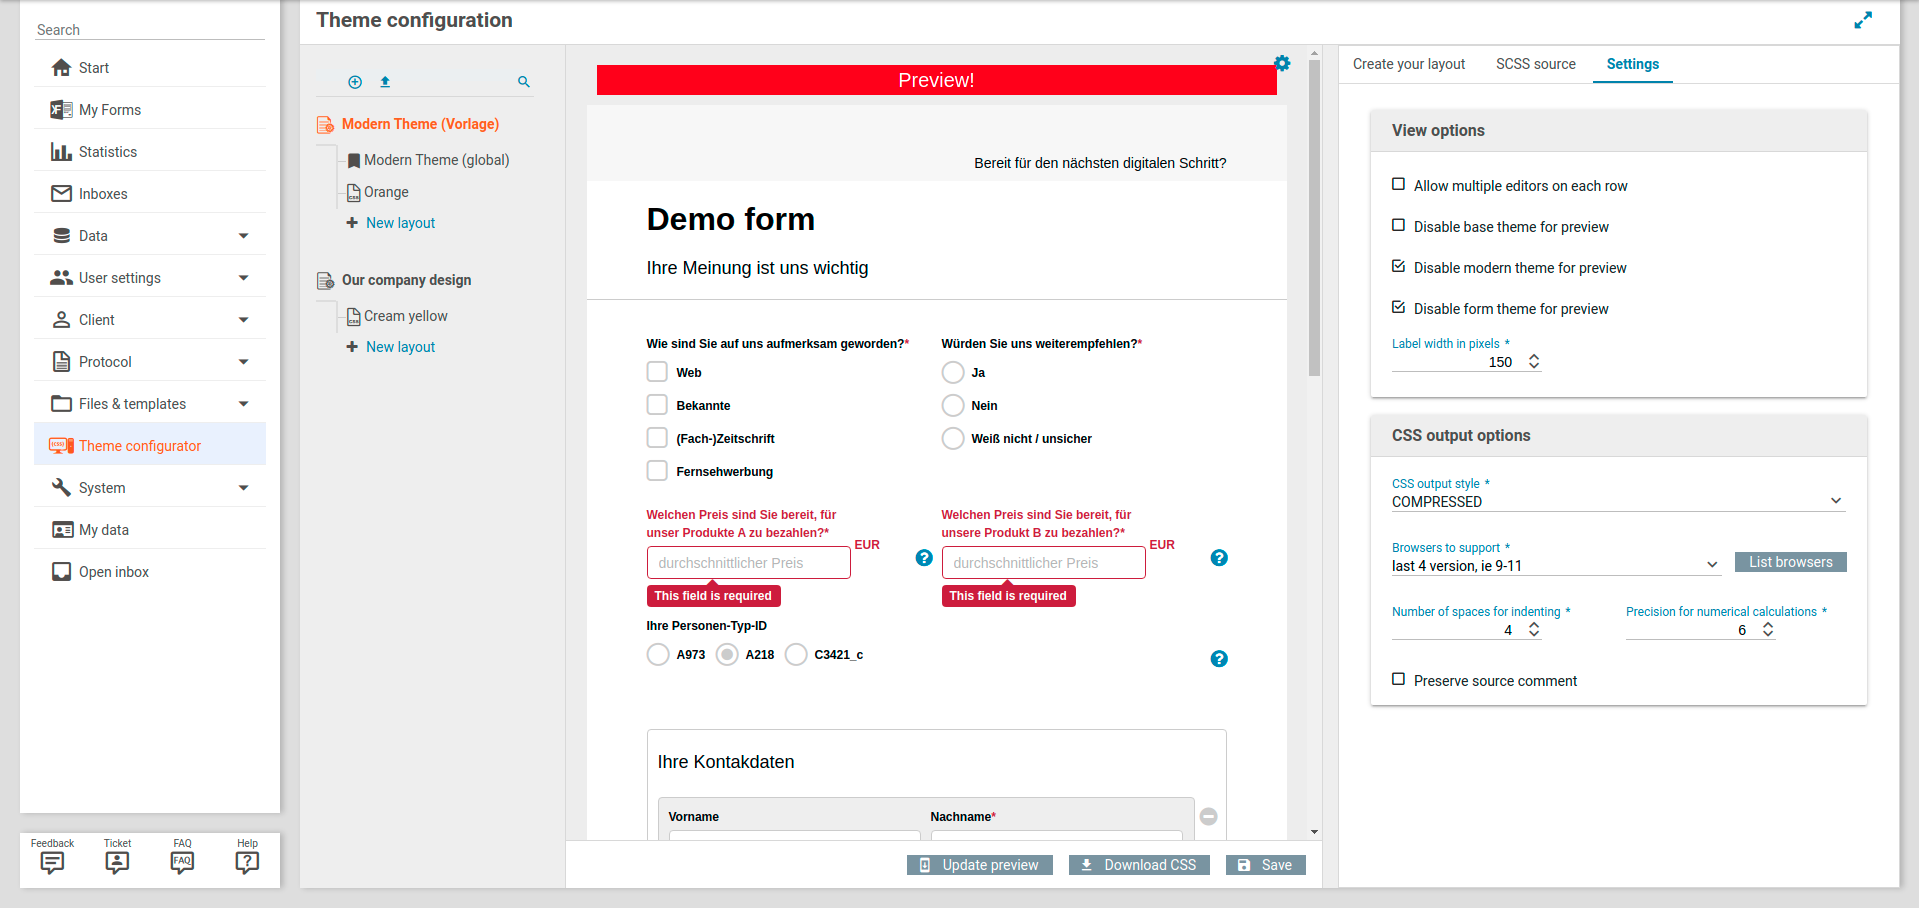
View settings
Here you can find settings regarding the preview and the layout of the variable editors.
- Allow multiple editors on each row
- By default, all editors are place vertically, one editor per line. When this option is enabled, you can place editors next to each other. We recommend you use this option with care as multiple editors in a line can quickly result in visual clutter.
- Disable base theme for preview
- When this option is enabled, the base Css provided by Xima® Formcycle is disabled for the preview. Whether this option should be enabled depends on whether your Scss builds upon the base Css or is meant to be used standalone.
- Disable modern theme for preview
- When this options is enabled, the modern them Scss provided by Xima® Formcycle is disabled for the preview. Whether this options should be enabled depends on whether your Scss builds upon the modern theme Css or requires only the base Css.
- Disable form theme for preview
- When this option is enabled, the theme as selected in the Xima® Formcycle Designer is disabled for the preview.
CSS output options
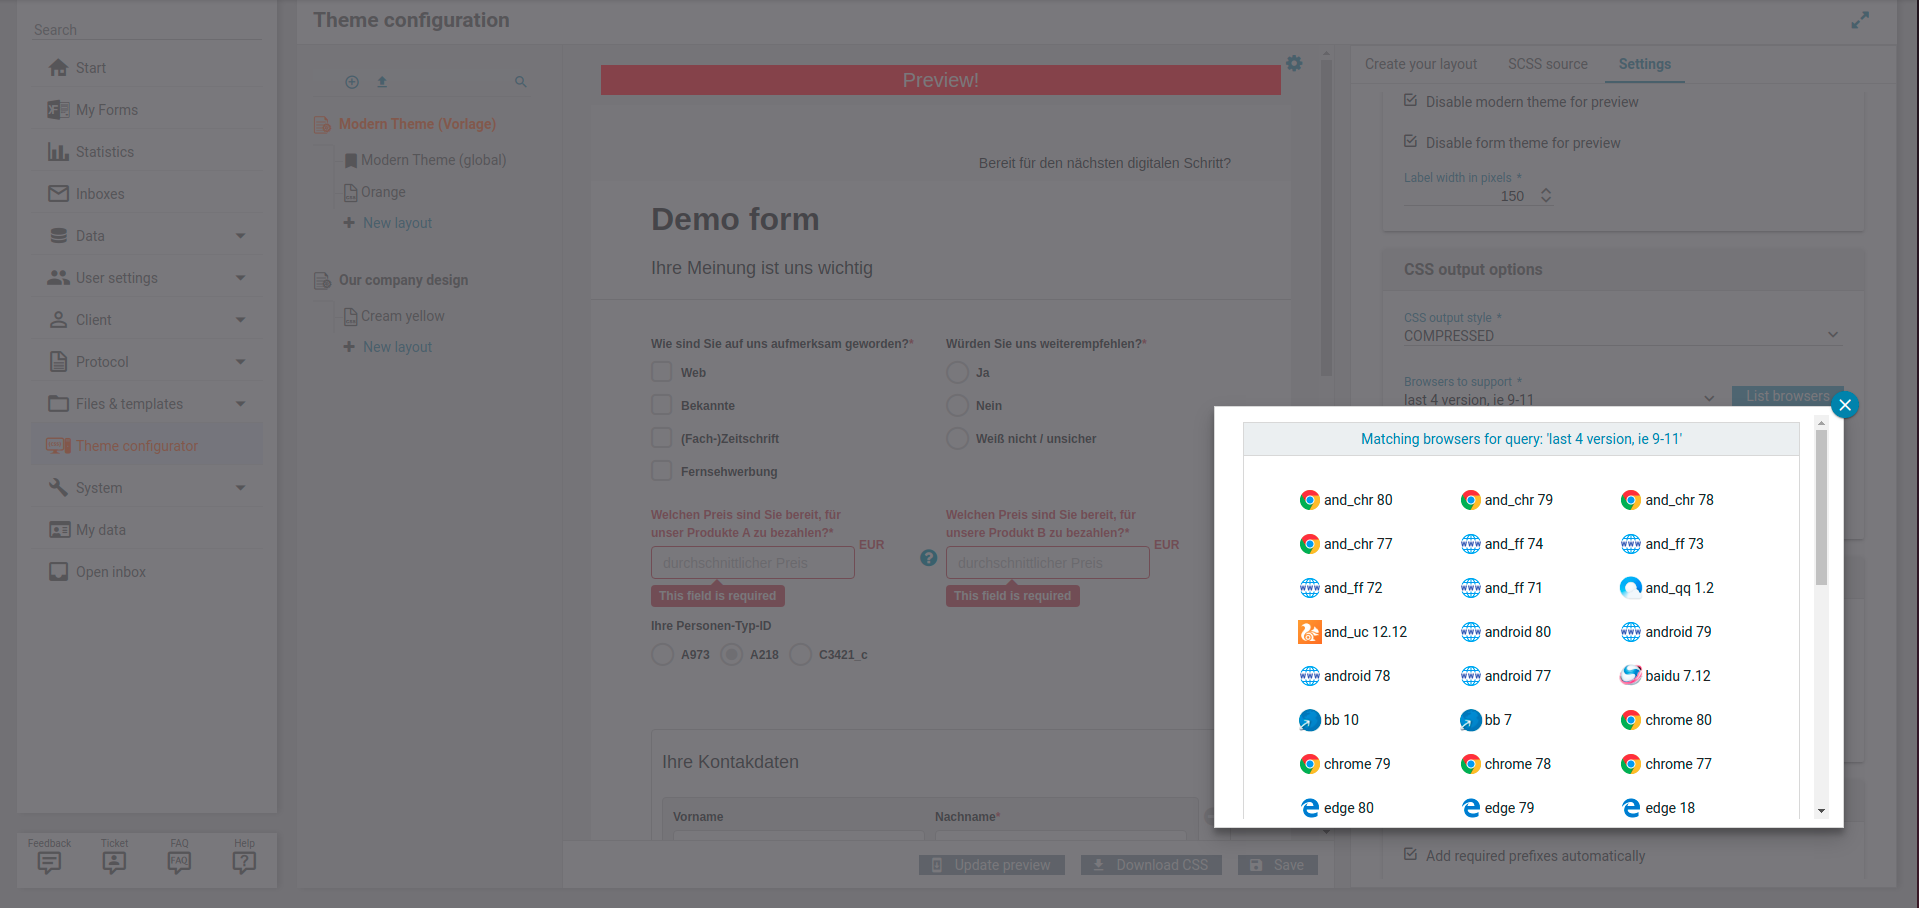
This section lets you configure basic settings for the Scss transpilation, such as whether the result should be minified and which browsers you would like to target.
- Css output style
- Defines whether the created Css should be minified or be kept readable.
- COMPACT
- Each selector rule with all its declarations is output on a single line.
- COMPRESSED
- Attempts to reduce the size of the generated Css as much as possible, such as by removing superfluous new lines and spaces. This usually results in a file with a single line.
- EXPANDED
- All nested rules in the Scss are resolved and are output with any indentation. Each rule is written to a new line.
- NESTED
- Attempts to preserve the visul nesting of rules in the Scss by applying an appropriate indentation to each rule and declaration that is output.
- Browsers to support
- Here you can choose which browsers you would like to support. This affect, for example, which vendor prefixes are added automatically. Browsers are specified as a so-called browser query, see github.com/browserslist for details on the syntax of a query. Press the button List browsers to check whether your query is correct and which browsers it corresponds to.
- Number of spaces for indenting
- In case the output needs to be indented, this defines the number of spaces per indendation level.
- Precision for numerical calculations
- The precision (number of decimal places) for numerical calculations that need to be performed during the transpilation process, such as when different Css units need to be added and converted.
- Preserver source commments
- When this option is enabled, comments in the Scss are preserved.
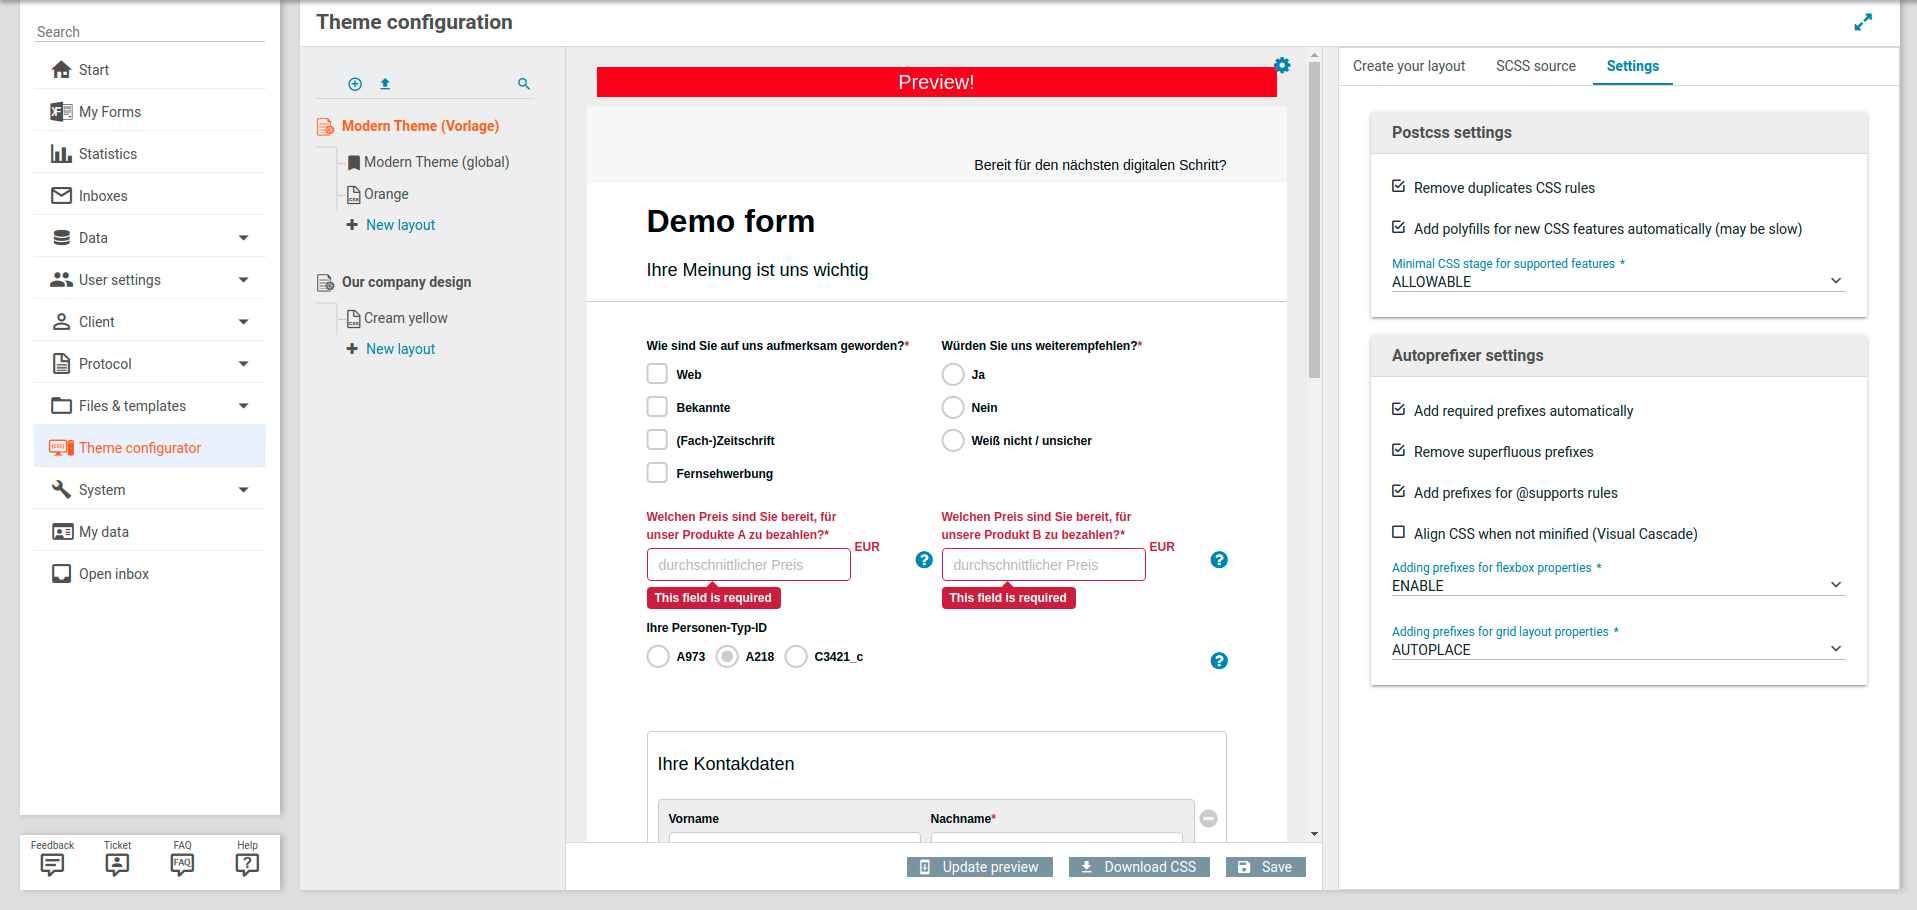
Postcss settings
Here you can change some settings regarind the postcss postprocessor.
- Remove duplicate Css rules
- When this option is enabled, duplicate Css rules are removed. This is usually not an issue, but may change the semantics in a few edge cases, such as when rules overwrite each other.
- Add polyfills for new Css features automatically.
- When this option is enabled, the postcss-preset-env plugin for postcss is enabled. This plugin converts some new Css features so that they can be used in old browsers. Whether a certain polyfill is enabled depends on the list of browsers to support (see above).
- Minimal Css stage for supported features
- Defines the minimal Css-Stage of a Css feature to be eligible for being polyfilled by postcss-preset-env.
Autoprefixer settings
This section lets you change several settings of the autprefixer plugin for postcss. This plugin appends vendor prefixes automatically. Which prefixes are added depends on the list of browsers to support (see above).
- Add required prefixes automatically
- When enabled, vendor prefixes are added automatically so you do not have to include them in you Scss.
- Remove superfluous prefixes
- When enabled, vendor prefixes are removed when they are not needed by any of the targetted browsers.
- Add prefixes for @supports rules
- When this option is enabled, vendor prefixes for the @supports rule are added.
- Align Css when not minified(Visual Cascade)
- Activates the cascade option of autprefixer (aignining declarations at the colon).
- Adding prefixes for flexbox properties
- When this option is enabled, vendor prefixes for the flexbox properties are added.
- Adding prefixes for grid layout properties
- When this option is enabled, vendor prefixes for grid properties are added.
Changelog
0.8.0
- Modifications for Xima® Formcycle version 6.5.x. This version is not compatible with version 6.4.x.
0.7.1
- The layout that ships with this plugin is not marked as the default modern theme anymore. This change is due to the fact that otherwise the file 031-extended.css would be created automatically when the plugin is initialized (such as when the FORMCYCLE server is restarted or updates). CSS client files are always included in all forms, which is usually not desired.
0.7.0
- Modifications for Xima® Formcycle version 6.4.x.
- Fix a bug issue that occasionally resulted in an eror page when selecting a layout template
- Fix several UI bugs.
- Update browserslist.
0.6.1
- Update browserslist.
- Update the modern theme template.
0.6.0
- Modifications for Xima® Formcycle version 6.3.x.
- It is now possible to select a layout as the standard modern theme.
- A layout can now be saved both as a client files as well as a Design (CSS) template.
- Forms in the preview now make use of all the available width. Change the form to preview by clicking on the gear icon to the top right.
- When the plugin is installed, a layout for the modern theme is created as well (in addition to a layout template).
- Fix several bugs.
0.5.0
- Several small changes to the user interface.
- Allow adding Url paramters to the form preview Url.
- Whether the base and modern theme should be disabled can now be set globally for each layout template.
- New setting for disabling the form theme in the preview
- Added the postcss-discard-duplicates to postcss
- When importing other Scss files, you can add the parameter previewOnly to the import Url. The import is then applied only when the file is transpiled for the form preview.
- Changed the syntax for importing other Scss file: the path must now be a valid Uri: @import "client/current/file.scss.
- Allow layout templates to be imported directly
0.4.0
- Small changed to the user interface.
- Add an option to prevent editors from being placed next to each other
0.3.0
- Allow the generated Css to be postprocessed and prefixed.
- Rework the import and export dialogs.
- Add dialogs for resolving invalid or missing references.
0.2.0
- Support multiple items to be selected for exporting
0.1.0
- Initial release.
- Supports Xima® Formcycle starting at version 6.1.x.