Posteingang
Beschreibung
Im Posteingang werden, je nach Berechtigung, alle eingegangenen Vorgänge (eingegangene Formulardaten) in der Standardansicht bzw. in den formularspezifischen Datenansichten übersichtlich dargestellt. Des weiteren ist es möglich, den Status eines Vorgangs zu ändern, Dateien hochzuladen, Kommentare zu verfassen und Vorgangsdaten zu exportieren.
Aufbau
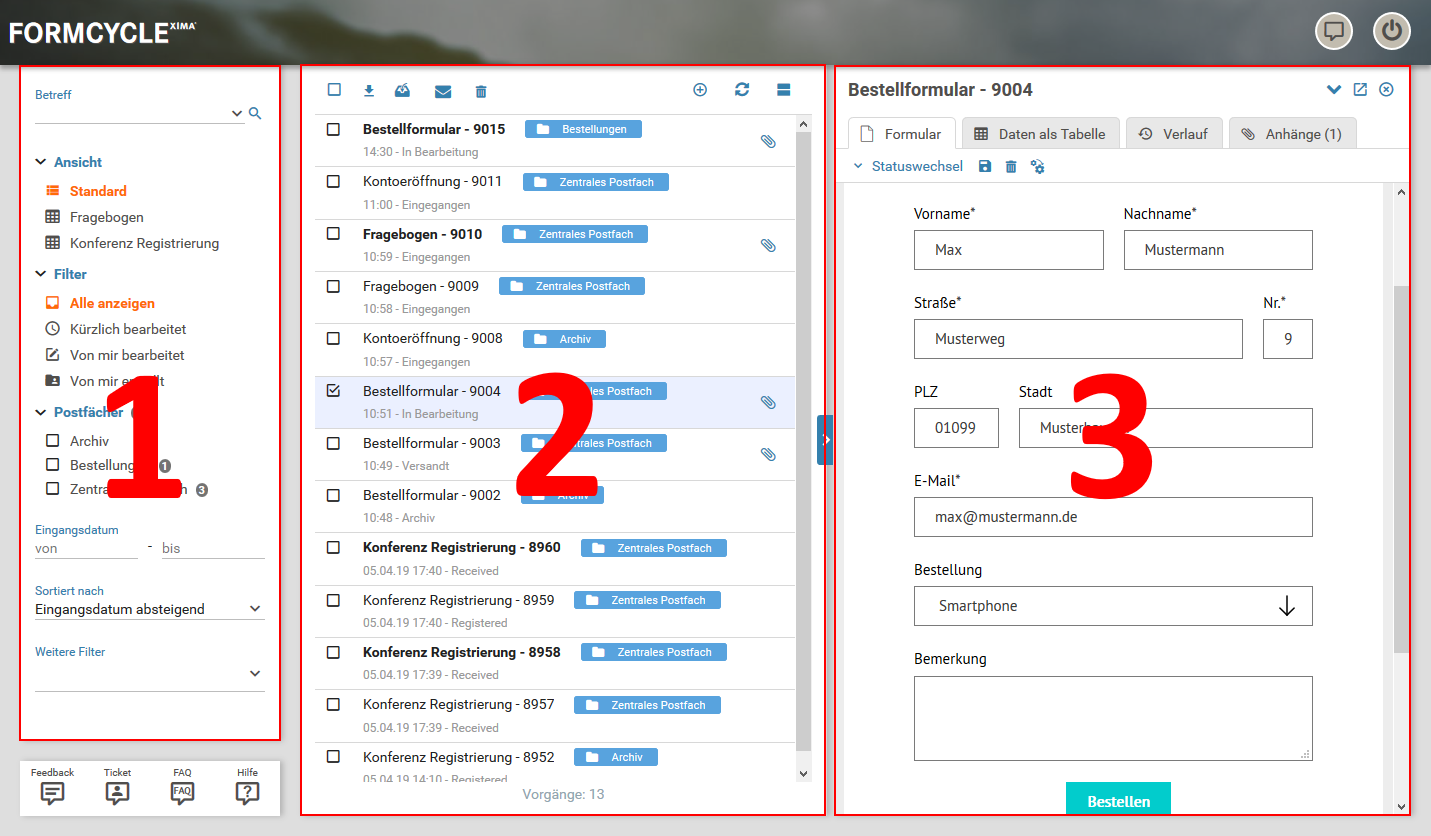
Der Posteingang besteht insgesamt aus drei Einzelteilen: dem Filtermenü am linken Rand, der Vorgangsliste und dem Lesebereich. Wird der Posteingang geöffnet, sind lediglich die Vorgangsliste und das Filtermenü sichtbar. Mit einem Klick auf einen Vorgang in der Vorgangsliste öffnet sich der Lesebereich des Vorgangs.
Filtermenü
Über das Filtermenü kann die Darstellung der Vorgänge in der Vorgangsliste angepasst werden. Folgende Filter stehen zur Verfügung:
Suche
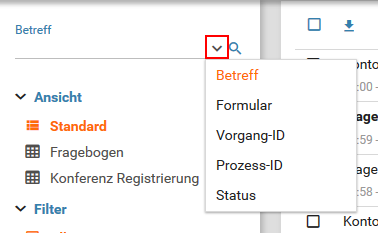
Ganz oben im Filtermenü befindet sich ein Eingabefeld, welches für die Suche nach Formularen verwendet werden kann. Über den Button rechts vom Eingabefeld kann der Suchtyp ausgewählt werden (siehe Abbildung). Es stehen folgenden Suchtypen zur Verfügung:
- Betreff
Suche nach Vorgängen mit dem gegebenen Betreff. - Formular
Suche nach Vorgängen mit dem gegebenen Formulartitel. - Vorgang-ID
Suche nach Vorgängen mit der gegebenen ID. - Prozess-ID
Suche nach Vorgängen mit der gegebenen Prozess-ID. - Status
Suche nach Vorgängen, die sich im gegebenen Status befinden.
Ist das Eingabefeld leer, wird kein Suchfilter angewandt. In formularspezifische Datenansichten wird das Suchfeld nicht dargestellt.
Ansicht
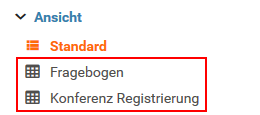
Die Ansichtenauswahl steht nur zur Verfügung, wenn formularspezifische Datenansichten konfiguriert wurden (für die Einrichtung einer formularspezifischen Datenansicht siehe Meine Formulare > Postfach). Die Auswahl der Ansicht beeinflusst, welche Vorgänge in der Vorgangsliste angezeigt werden und wie diese dargestellt werden. Es gibt zwei Ansichtstypen:
- Standard
Die Standardansicht kann nicht konfiguriert werden. Es werden, je nach Berechtigung, alle eingegangenen Vorgänge angezeigt (siehe Vorgangsliste). - Formularspezifische Datenansichten
Formularspezifische Datenansichten tragen die Namen der Formulare, zu denen sie zugeordnet sind. Diese Ansichten beinhalten nur die Vorgänge des jeweiligen Formulars. Vorgänge werden in der Vorgangsliste in einer Tabelle dargestellt. Die Anzahl der Spalten ist abhänging von der Ansichtskonfiguration (siehe Vorgangsliste).
Filter
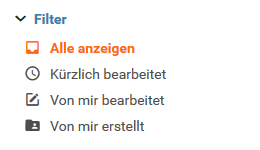
Es stehen vier Schnellfilter zur Verfügung, welche die Liste der Vorgänge beeinflusst.
- Alle anzeigen
Es werden alle Vorgänge der aktuellen Ansicht angezeigt. - Kürzlich bearbeitet
Es werden alle Vorgänge angezeigt, die in den letzten 14 Tagen bearbeitet wurden. - Von mir bearbeitet
Es werden alle Vorgänge angezeigt, die zuletzt vom angemeldeten Benutzer bearbeitet wurden. - Von mir erstellt
Es werden alle Vorgänge angezeigt, die vom angemeldeten Benutzer erstellt wurden.
Terminpläne 6.5.0+
Dieses Filtermenü steht nur in der Kalenderansicht zur Verfügung. Terminpläne, die gebuchte Termine besitzen, können hier an-/abgewählt werden. In der Kalenderansicht erscheinen nur Termine der gewählten Terminpläne.
Postfächer

Jeder Vorgang befindet sich in einem Postfach. Standardmäßig ist dies das Zentrale Postfach. In welchem Postfach ein Vorgang nach dem Absenden landen soll, ist in den Postfach-Einstellungen des Formulars einzustellen. Mit dem Postfachfilter können nur die Vorgänge angezeigt werden, die sich in den selektierten Postfächern befinden. Neben den einzelnen Postfächern steht eine Zahl, welche die Anzahl der unglesenen Vorgänge im Postfach angibt. Ist diese Zahl nicht vorhanden, dann gibt es keine ungelesenen Vorgänge im Postfach. Ist kein Postfach selektiert oder der Postfachfilter nicht vorhanden (weil sich alle Vorgänge im selben Postfach befinden), so werden die Vorgänge aller Postfächer angezeigt.
Der Postfachfilter ist abhängig von der gewählten Ansicht. Befinden sich die Vorgänge in der Vorgangsliste in mehr als einem Postfach, so wird der Postfachfilter dargestellt. Ist dies nicht der Fall, dann wird der Postfachfilter ausgeblendet.
Eingangsdatum
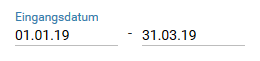
Die Vorgangsliste kann nach dem Eingangsdatum der Vorgänge gefiltert werden. Hierfür stehen zwei Eingabefelder zur Verfügung:
- von
Es werden alle Vorgänge angezeigt, die ab dem gegebenen Datum eingegangen sind. - bis
Es werden alle Vorgänge angezeigt, die bis zum gegebenen Datum eingegangen sind.
Wenn die Felder leer sind, wird nicht nach dem Eingangsdatum gefiltert.
Sortierung
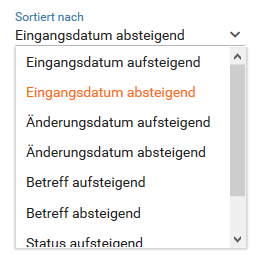
Die Standardansicht der Vorgangsliste kann nach verschiedenen Kriterien sortiert werden. Ist eine formularspezifische Datenansicht ausgewählt (siehe Ansicht), ist dieses Feld nicht verfügbar. Die Sortierung der formularspezifischen Datenansichten erfolgt über die Spalten der Tabelle. Folgende Kriterien stehen (in auf- und absteigender Richtung) für die Sortierung zur Verfügung:
- Eingangsdatum
- Änderungsdatum
- Betreff
- Status
Weitere Filter
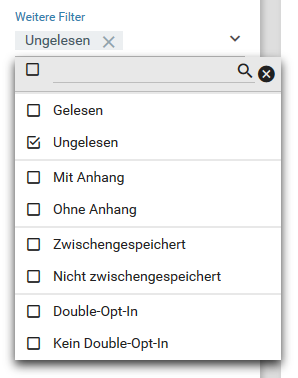
Um die Suche nach Vorgängen noch weiter zu verfeinern, stehen weitere Filter zur Verfügung:
- (Un-)Gelesen
Es werden nur Vorgänge angezeigt, die (un-)gelesen sind. - Mit/Ohne Anhang
Es werden nur Vorgänge angezeigt, die (keine) Dateien im Anhang haben. - (Nicht) Zwischengespeichert
Es werden nur Vorgänge angezeigt, die (nicht) zwischengespeichert sind. - (Kein) Double-Opt-In
Es werden nur Vorgänge angezeigt, die sich derzeit im Status Warten auf Opt-In befinden (siehe Double-Opt-In zur Einrichtung).
Vorgangsliste
Die Vorgangsliste zeigt alle Vorgänge abhängig von den derzeit gesetzten Filtern an. Es gibt zwei verschiedene Ansichten der Vorgangsliste: die Standardansicht und die formularspezifische Datenansicht. Die Ansicht kann über das Filtermenü gewechselt werden.
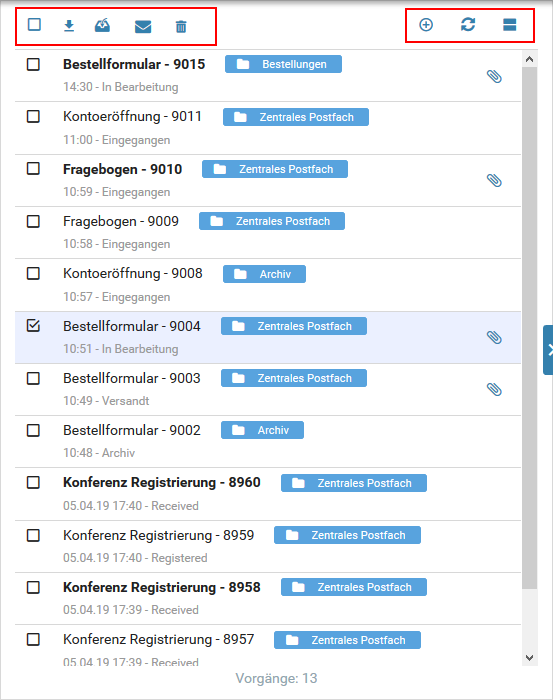
Durch einen Klick auf einen Vorgang in der Vorgangsliste wird dieser im Lesebereich geöffnet. Ist der Lesebereich noch nicht sichtbar, wird dieser mit einem Klick auf einen Vorgang geöffnet. Nach dem Öffnen eines Vorgangs wird dieser als gelesen markiert und die Schrift wird vom Schriftschnitt fett auf normal geändert. Bei Filterung nach ungelesenen Vorgängen wird dieser Vorgang dann nicht mehr angezeigt. Um einen Vorgang wieder auf ungelesen zu setzen, klicken Sie auf die entsprechende Schaltfläche in der Kopfzeile.
In der Kopfzeile der Vorgangsliste befinden sich zwei Buttonlisten (siehe Abbildung). Links befinden sich die Vorgangsaktionen und rechts allgemeine Aktionen.
Vorgangsaktionen
Welche der Vorgangsaktionen erscheinen, ist abhängig von den derzeit selektierten Vorgängen.
Selektion aller Vorgänge
Selektiert alle Vorgänge basierend auf den derzeit gesetzten Filtern. Diese Checkbox ist immer vorhanden.
Exportieren
Exportiert entweder alle selektierten Vorgänge oder, wenn keine Vorgänge selektiert sind, alle Vorgänge basierend auf den derzeit gesetzten Filtern.
Siehe Exportieren um mehr Details zum Export zu erfahren.
Verschieben
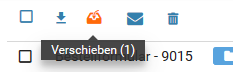
Durch Klick auf die Verschieben-Schaltfläche (siehe Abbildung) öffnet sich ein Dialog, in welchem das Zielpostfach zu wählen ist. Alle selektierten Vorgänge werden mit Bestätigen des Dialogs in das gewählte Postfach verschoben. Beim Verschieben von Vorgängen wird keine Aktion der Statusverarbeitung ausgeführt.
/ (Un-)Gelesen
Ein Klick auf die Schaltfläche markiert die selektierten Vorgänge als gelesen bzw. ungelesen.
Löschen
Ein Klick auf die Schaltfläche löscht die selektierten Vorgänge. Diese Funktion ist nur verfügbar, wenn alle selektierten Vorgänge löschbar sind.
Ein Vorgang kann nur gelöscht werden, wenn er sich in einem Status befindet, der dies erlaubt. In der Status- bzw. Zugriffskonfiguration muss die Option Vorgänge sind in diesem Status löschbar bzw. Vorgänge löschbar aktiviert sein. Ist dies nicht der Fall, kann der Vorgang nicht gelöscht werden.
Allgemeine Aktionen
Auf der rechten Seite der Kopfzeile befinden sich allgemeine Aktionen, welche immer verfügbar sind:
Neuer Vorgang
Öffnet ein Menü, mit welchem bereits existierende Formulare aufgerufen werden können, um neue Vorgänge abzusenden.
Aktualisieren
Aktualisiert die Ansicht.
/ Position des Lesebereichs
Wechselt die Position des Lesebereichs von rechts nach unten oder umgekehrt.
Standardansicht

In der Standardansicht werden, im Gegensatz zur formularspezifischen Datenansicht und abhängig von den gesetzten Filtern, alle Vorgänge angezeigt. Besitzt ein Vorgang Anhänge, so wird in der Liste ein Symbol für die Anhänge dargestellt (siehe Abbildung). Ein Klick auf das Symbol bringt den Nutzer direkt zur Anhangseite im Lesebereich des Vorgangs. Jeder Vorgangseintrag besteht aus dessen Betreff, Eingangsdatum, Status sowie Postfach (blau hinterlegt, siehe Abbildung). Ein Klick auf das Postfach setzt einen Postfachfilter auf dieses Postfach.
Kalendaransicht 6.5.0+
Die Kalenderansicht ist verfügbar, wenn Vorgänge mit Terminen exisitieren. In dieser Ansicht werden die gebuchten Termine dargestellt. Welche Terminpläne dargestellt werden sollen, kann im Filtermenü eingestellt werden.
Formularspezifische Datenansicht
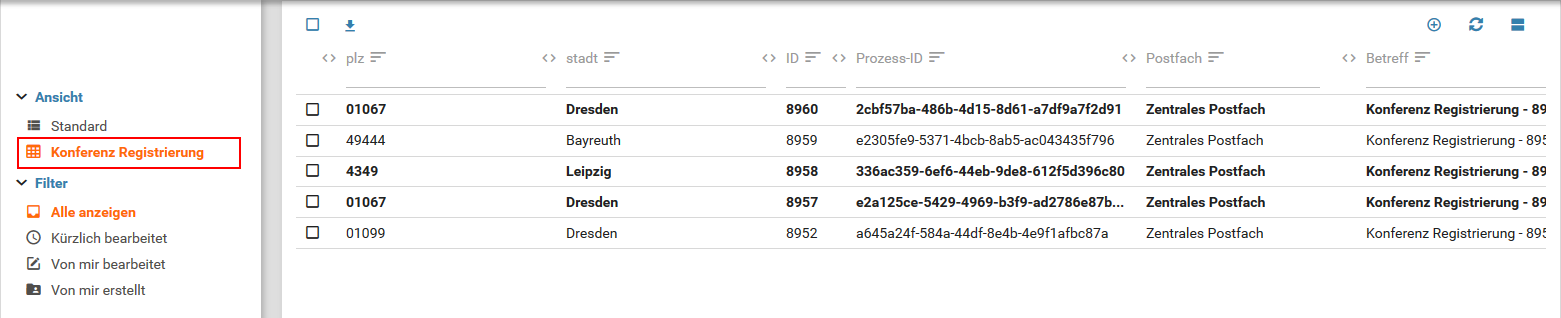
Die formularspezifischen Datenansichten sind Tabellenansichten, welche zur Verfügung stehen, sobald die Anzeigespalten des Formulars konfiguriert wurden (siehe Formular > Postfach). Die Werte der konfigurierten Formularelemente sowie weitere Formularinformationen werden in der Tabelle dargestellt. Es kann nach jeder Spalte sortiert und gefiltert werden. Beitzt ein Vorgang Anhänge, so wird in der Zeile ein Symbol für die Anhänge dargestellt (siehe Abbildung). Ein Klick auf das Symbol bringt den Nutzer direkt zur Anhangseite im Lesebereich des Vorgangs.
Exportieren
Durch einen Klick auf Exportieren in der Vorgangsliste werden alle selektierten Vorgänge oder alle Vorgänge basierend auf den derzeit gesetzten Filtern exportiert, wenn keine Vorgänge selektiert sind (siehe Vorgangsaktionen).
Beispiel:
Es sind keine Vorgänge selektiert und es ist ein Filter auf das Postfach "Zentrales Postfach" gesetzt, dann werden alle Vorgänge die sich im "Zentralen Postfach" befinden exportiert. Um die Vorgänge aller Postfächer zu exportieren muss der Filter auf das "Zentrale Postfach" entfernt werden.
Es gibt drei verschiedene Varianten ein Formular zu exportieren:
XML
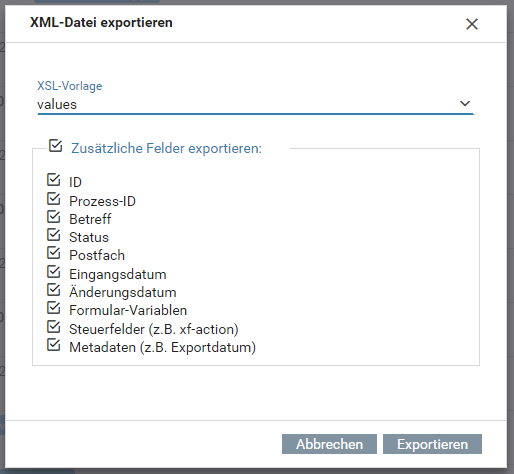
Die Formulardaten (alle Formularelemente) werden flach als XML Struktur exportiert.
<processes>
<process process-uid="xxx" creation-date="yyyy-mm-dd HH:mm:ss.ms TZ" project-name="yyy" status="zzz">
<form version="1">
<field name="elName">
<plainValue><![CDATA[Wert]]></plainValue>
<values count="1">
<value index="0"><![CDATA[]]></value>
</values>
<label><![CDATA[]]></label>
</field>
...
</form>
<process ...>
</processes>
</xfc-data>
Über eine XSL-Vorlage (siehe Abbildung) kann das exportierte XML in das gewünschte Zielformat transformiert werden. Die entsprechende Vorlage kann über die Auswahlliste gewählt werden. Siehe hierzu auch XSL Vorlage erstellen.
Excel
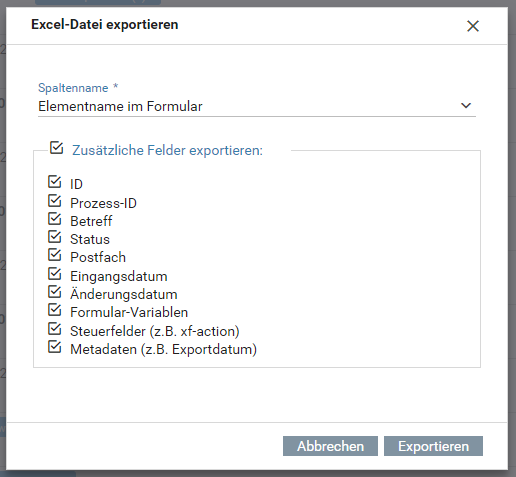
Alle Daten werden in eine Excel-Datei exportiert. Wurden Vorgänge mehrere Formulare selektiert, so wird für jedes Formular ein eigenes Arbeitsblatt in der Excel-Datei angelegt.
Alle Werte von wiederholten Formularelementen werden kommasepariert in die gleiche Zelle geschrieben. Ist dies nicht erwünscht, wird die Exportfunktion Excel (mehrzeilig) empfohlen.
Die Spalten der resultierenden Excel-Datei können unterschiedlich benamt werden:
- Elementname im Formular
Für die Excel-Spaltennamen werden die Elementnamen verwendet, die im Xima® Formcycle-Designer definiert wurden (z.B.: tf1, sel1, ...). - Elementalias im Formular
Für die Excel-Spaltennamen werden die Elementaliase verwendet, die im Xima® Formcycle-Designer definiert wurden. - Spaltenname der Datentabelle
Für die Excel-Spaltennamen werden die in der Postfach-Konfiguration definierten Spaltennamen verwendet. Diese Auswahl ist nur in der formularspezifischen Datenansicht verfügbar.
Excel (mehrzeilig)
Der Export funktioniert genauso wie der einfache Excel-Export mit dem Unterschied, dass die Werte wiederholter Formularelemente in jeweils separate Zeilen geschrieben werden.
Metadaten exportieren (Optional)
Zusätzlich können bei allen Exportvarianten Metadaten exportiert werden (siehe Abbildung XML-Export/Excel-Export). Folgende optionale Felder können exportiert werden:
- ID 6.4.0+
System-ID des jeweiligen Vorgangs. - Prozess-ID
Prozess-ID des jeweiligen Vorgangs. - Betreff 6.4.0+
Betreff des jeweiligen Vorgangs. - Status
Name des Status, in dem sich der jeweilige Vorgang zum Zeitpunkt des Exports befindet. - Postfach 6.4.0+
Postfach, in dem sich der jeweilige Vorgang befindet. - Eingangsdatum
Erstellungszeitpunkt des Vorgangs. - Änderungsdatum
Zeitpunkt der letzen Änderung am Vorgang. - Formular-Variablen
Konfigurierte Formularvariablen und deren Werte. - Steuerfelder
Steuerfelder des Formulars wie xf-action, welches den Namen der zum Absenden des Formulars geklickten Schaltfläche beinhaltet. - Metadaten
Datum des Exports und verwendete FORMCYCLE-Version.
Lesebereich
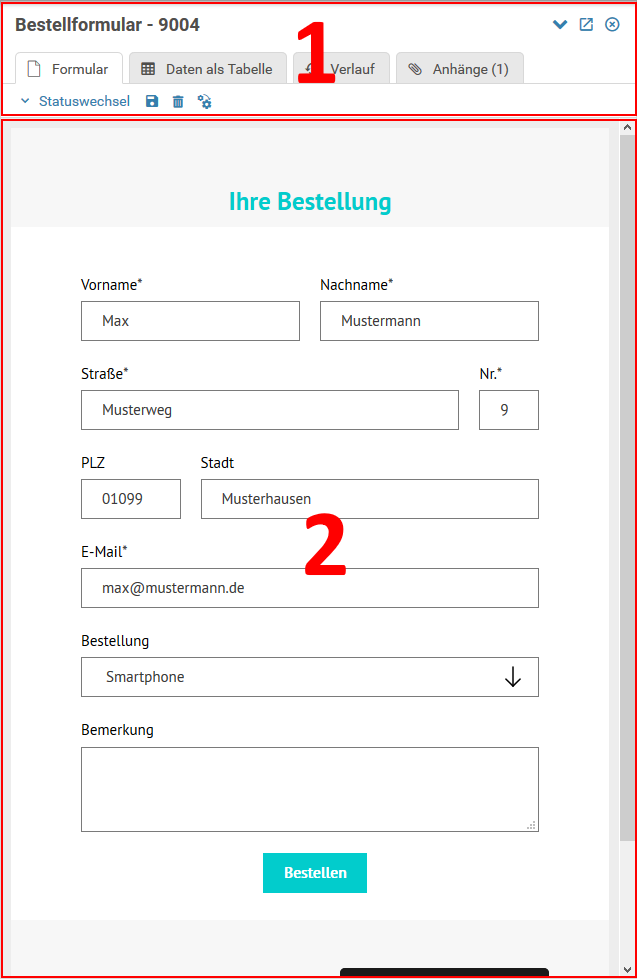
Per Mausklick ausgewählte Vorgänge werden im Lesebereich des Posteingangs dargestellt. Im Lesebereich können die eingegebenen Daten eingesehen und eine Reihe von Aktionen auf dem Vorgang ausgeführt werden. Der Lesebereich unterteilt sich in den Kopf- und Inhaltsbereich (siehe Abbildung).

Der Kopfbereich dient der Navigation und Steuerung des selektierten Vorgangs. Er unterteilt sich in Titelleiste, Navigationsleiste und Aktionsleiste. Abhänging von der Auswahl in der Navigationsleiste werden im Inhaltsbereicht unterschiedliche Aspekte des Vorgangs aufbereitet dargestellt. Zudem ändern sich die verfügbaren Vorgangsaktionen in der Aktionsleiste in Abhängigkeit von der Auswahl in der Navigationsleiste.
Titelleiste
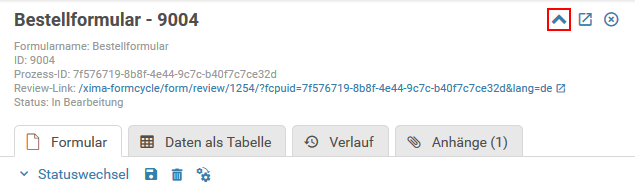
Die Titelleiste stellt Meta-Informationen über den Vorgang zur Verfügung. Links steht der Betreff des ausgewählten Vorgangs. Rechts sind drei Buttons zu finden:
- Details
Klappt die Titelleiste auf, um weitere Vorgangsinformationen darzustellen (siehe Abbildung). - Öffnen in neuem Tab
Öffnet den aktuellen Vorgang in einem neuen Tab. - Schließen
Schließt den Lesebereich
Navigationsleiste
Die Navigationsleiste bietet eine Reihe von Reitern, um verschiedene Aspekte des Vorgangs darzustellen. Abhängig vom gewählten Navigationsreiter ändern sich die verfügbaren Aktionen in der Aktionsleiste sowie der Inhaltsbereich.
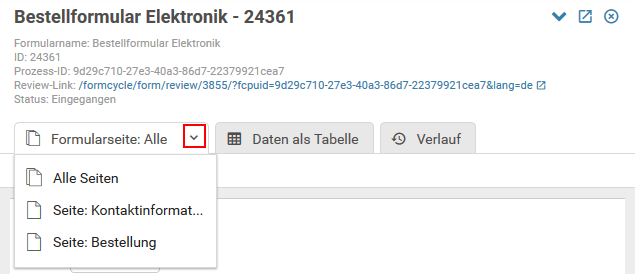
- Formularseite
Ein Klick auf diesen Reiter zeigt das ausgefüllte Formular. Besitzt das ausgewählte Formular mehrere Seiten, welche der Benutzer im aktuellen Status aufrufen kann, ist es möglich, die Formularseite über das Ausklappen-Icon am Seitenreiter zu wechseln. Es ist zudem möglich alle Seiten anzuzeigen (siehe Abbildung).
Unter diesem Reiter sind folgende Vorgangsaktionen möglich: - Daten als Tabelle
Die abgesendeten Formulardaten werden als Tabelle dargestellt. - Verlauf
Zeigt den Verlauf des Vorgangs. Im Verlauf werden Statuswechsel, ausgeführte Aktionen, angehangene Dateien, etc. protokoliert. Unter diesem Reiter sind folgende Vorgangsaktionen möglich: - Anhänge
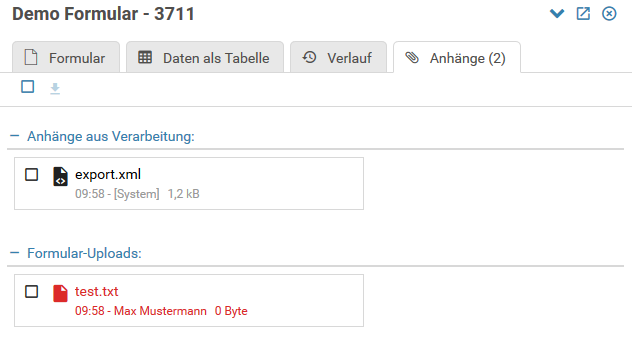
Besitzt der Vorgang Anhänge, wird dieser Reiter dargestellt, welcher Zugriff auf die Anhänge des Vorgangs ermöglicht. Der Anhangsbereich eines Vorgangs ist unterteilt in Anhänge aus Formularuploads und Anhänge aus der Verarbeitung. Formularuploads werden über das Uploadelement eines Formulars angehangen. Anhänge aus der Verarbeitung entstehen durch dateierzeugende Aktionen. Anhänge mit einer Größe von 0 Byte werden rot dargestellt.- (De-)Selektion aller Vorgänge
- Download
- Anhänge löschen
Aktionsleiste
- Statuswechsel
Wechselt den Status des Vorgangs, wobei Änderungen im Formular gespeichert und die Aktionen des gewählten Status ausgeführt werden. Diese Aktion steht nur zur Verfügung, wenn der Status vom Nutzer gewechselt werden kann. Der Status kann nur gewechselt werden, wenn:- der ausgewählte Vorgang in seinem aktuellen Status einen Folgestatus besitzt
- in den Formulareinstellungen definiert wurde, dass ein Statuswechsel für Vorgänge dieses Formulars durch den aktuellen Benutzer möglich ist
- Speichern
Speichert Änderungen im Formular. - Löschen
Löscht den Vorgang und schließt den Lesebereich anschließend. Vorgänge können nur gelöscht werden, wenn sie sich in einem Status befinden der dies erlaubt (siehe Zugrifsskonfiguration). - Erweiterte Optionen
Öffnet einen Dialog, welcher erweiterte Vorgangsänderungen ermöglicht:- Formulardaten korrigieren: Speichert Änderungen im Formular mit der Option die Formulardaten (nicht) zu validieren.
- Aktionen des aktuellen Status erneut ausführen: Führt die Aktionen des aktuellen Status erneut aus. Dabei kann konfiguriert werden, ob Änderungen im Formular gespeichert und validiert werden sollen.
- Statuswechsel: Analog zum normalen Statuswechsel, wobei konfiguriert werden kann, ob die Aktionen des Zielstatus ausgeführt werden sollen und ob Änderungen im Formular gespeichert und validiert werden sollen. Diese Aktion steht nur zur Verfügung, wenn der Status vom Nutzer gewechselt werden kann.
- Eintrag hinzufügen
Öffnet einen Dialog, welcher es ermöglicht, dem Vorgang Protokolleinträge bzw. Bemerkungen und zusätzliche Dateianhänge hinzuzufügen. Die Protokolleinträge werden im Verlauf des Vorgangs dargestellt. Ausgewählte Dateien werden an den Vorgang angehangen. - Download von Anhängen
Lädt die ausgewählten Anhänge herunter. - Anhänge löschen
Löscht die ausgewählten Anhänge.